
Echoes Design Document
High Level Concept
Summary
Zirconia is an environmental discovery game with a medieval tone, where the player will solve puzzles, unlocking a story as they progress.
The player will be given puzzles that test their intelligence and resilience. As the story progresses, the player makes story choices. At the end, the impact of the players choices will be revealed.
The player does not embody a character, but they are spoken to directly by a Narrator, and introduced to many characters who are protagonists in the stories being told.
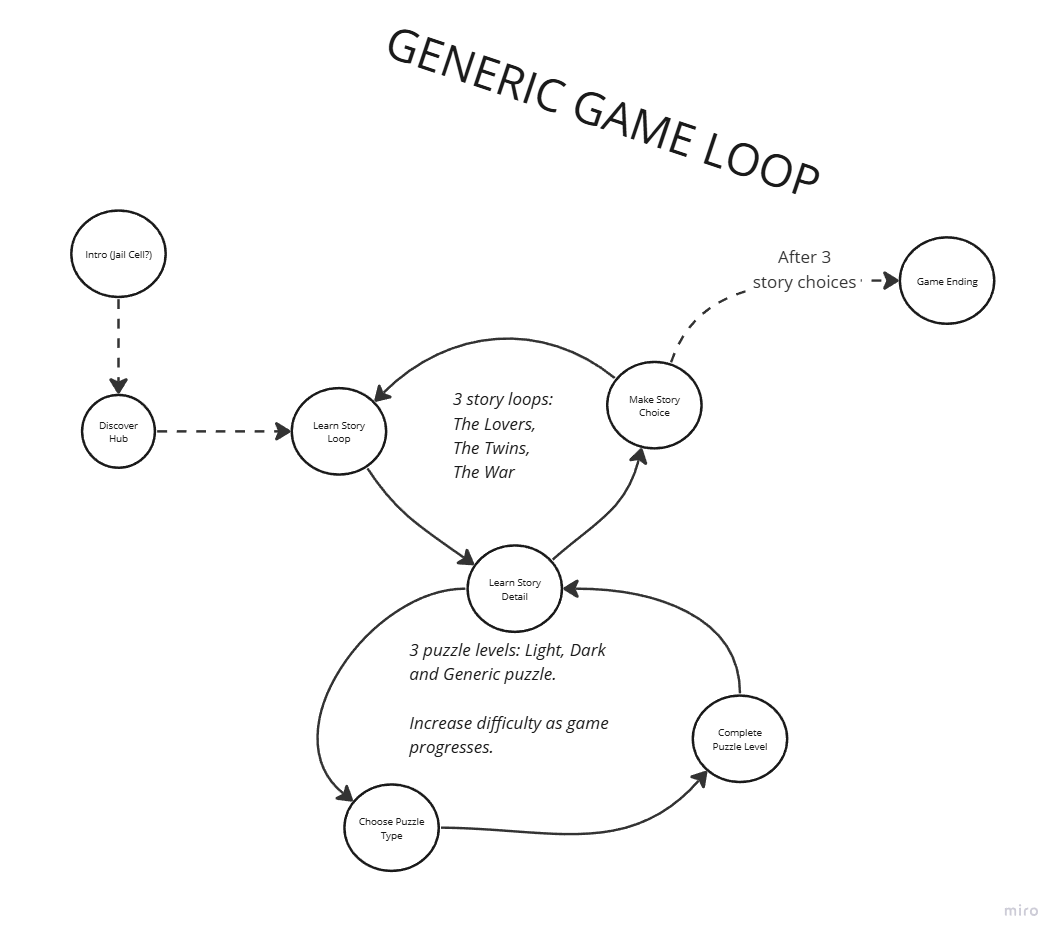
Game Loop
- Introduction room for light tutorial.
- Main game loop is Hub-Spoke, with puzzle rooms as the spokes.
- Player goes back to the hub for story continuation, and to make story choices.
- Ends when all story choices are made.
Player Choice
- Players choose resolutions to each story.
- In each story set, players can choose which of the three puzzle types they complete first.
Player Rewards
- Reward for completing single puzzles is more story.
- Reward for completing a puzzle set is a story choice, giving a branching narrative.
- Reward for progression is more challenging puzzles.
- Reward for completing the game is a story resolution based on your choices.
Win & Lose
- There is no ‘Game Over’ state.
- If the Dark puzzle is failed, the player will pass out and wake up in the Hub.
World Tone
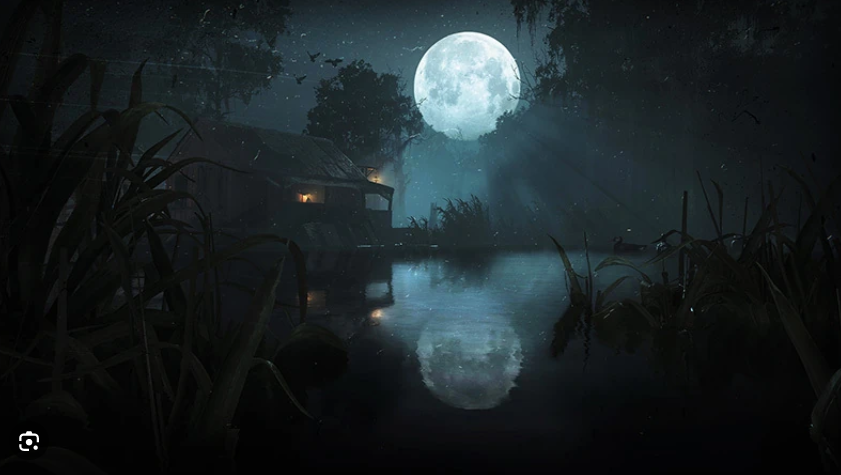
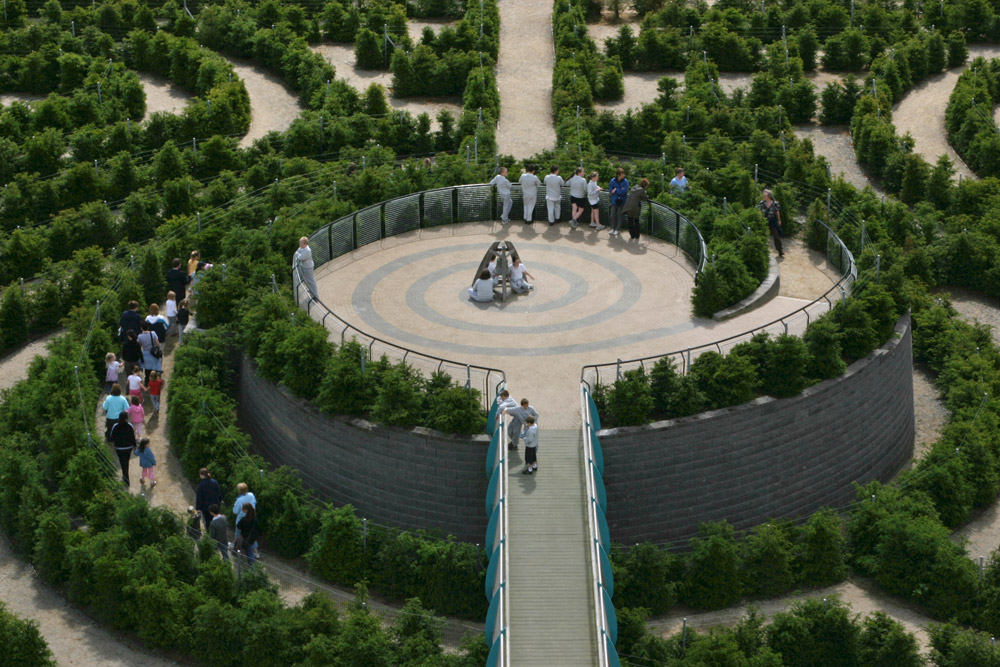
Tone of the world is medieval, with light gothic elements.
Puzzles are based on old technology; cogs, gears, pulley systems, traps and triggers, similar to puzzles found in Indiana Jones or Tomb Raider. This gives the game an analogue, old world feel.
Key components,
- Medieval, once splendid but now in disrepair.
- Old technology, built strongly but unused for a long time.
- Dark, gloomy, damp and dilapidated.
- Subtle religious shape language, but no direct references.
The world hides secrets; lore and story and given to the player in snippets, hinting of more depth, similarly the Hub hints at unexplored areas and mystery.
The dominant medieval religion in England (Catholicism) is hinted at. No direct religious references (e.g. crosses, bible verses) but shape language can indicate crosses. Light and Dark puzzles are loosely twinned with Heaven and Hell.
Lighting
Lighting varies depending on the location of the player. The lighting is generally dark, with spaces lit by torchlight.
- Introduction room is a confined space, with high windows giving some natural light.
- Hub is a large space, the middle lit by natural light, but areas outside the middle are lit by torchlight.
- Light puzzle types are lighter, lit by natural light from the ceiling.
- Dark puzzle type is dark, oppressive, with no natural light, torchlight and bonfires only.
- Story puzzles types have same light tone as the Hub.
Outside it is night, and a full moon. Blue light from the moon enters the scene and mixes with the orange torchlight.
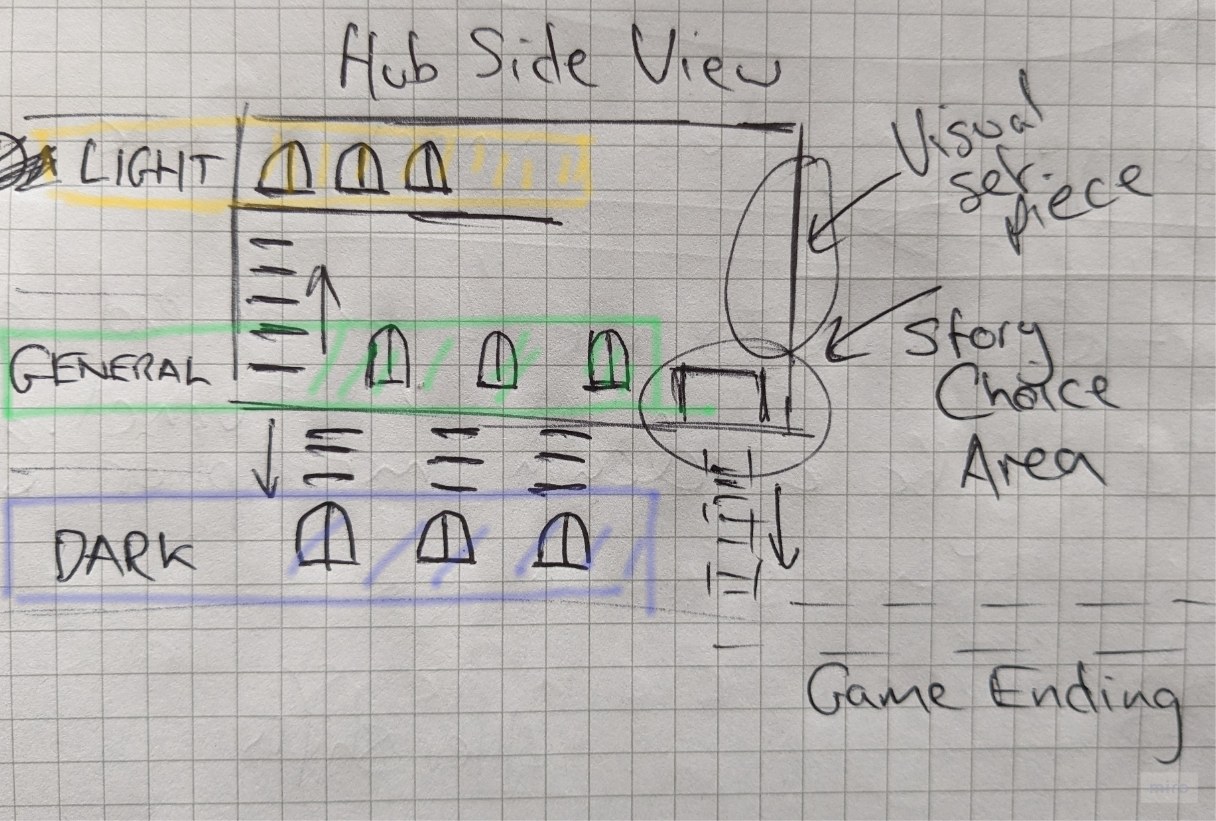
Verticality
- Hub has 3 levels of verticality, representing Light, Dark and Story puzzle types.
- Puzzle rooms do not have verticality.
Puzzles
Puzzles are grouped into puzzle types, with each type giving the player a different challenge, Light - A classic, logic based puzzle solving challenge. Low intensity, open space, no time limit. Dark - An intense, dark, time bound, horror themed maze. Story - A mixed bag of simple puzzles which develop the story, and give the player an opportunity for a break between the more intense puzzles.
Narrative Design
A high level ‘story treatment’ for the families and their characters has been written. Chunks of this story treatment can be given to the player as; Narrator dialogue, letters, and environmental storytelling.
Narrator Dialogue
- Dialogue spoken by ‘The Narrator’ is the primary method of storytelling.
- The Narrator is a character that is never directly referenced. They represents a deceased / dethroned ‘Head’ of the house.
Letters
- Additional elements of backstory in the game.
- Often found in Story Puzzle Rooms, but can be elsewhere.
- Letter could be read out, see ‘Dictated Letters’ mechanic.
- Letters contain illegible text, an overlay UI will display the words, allowing for easy localisation.
Environmental Storytelling
- Story Puzzle Rooms - Could transport you to a key moment of the story.
- Dark Bonfires - Snippets of story could be told as a reward for reaching bonfires in the Dark Puzzle Rooms.
- Gated Alters - Fog lifts in the gated alter revealing an environmental story.
Narrative Flow
Story is linear, with some variations in dialogue based on player choices.
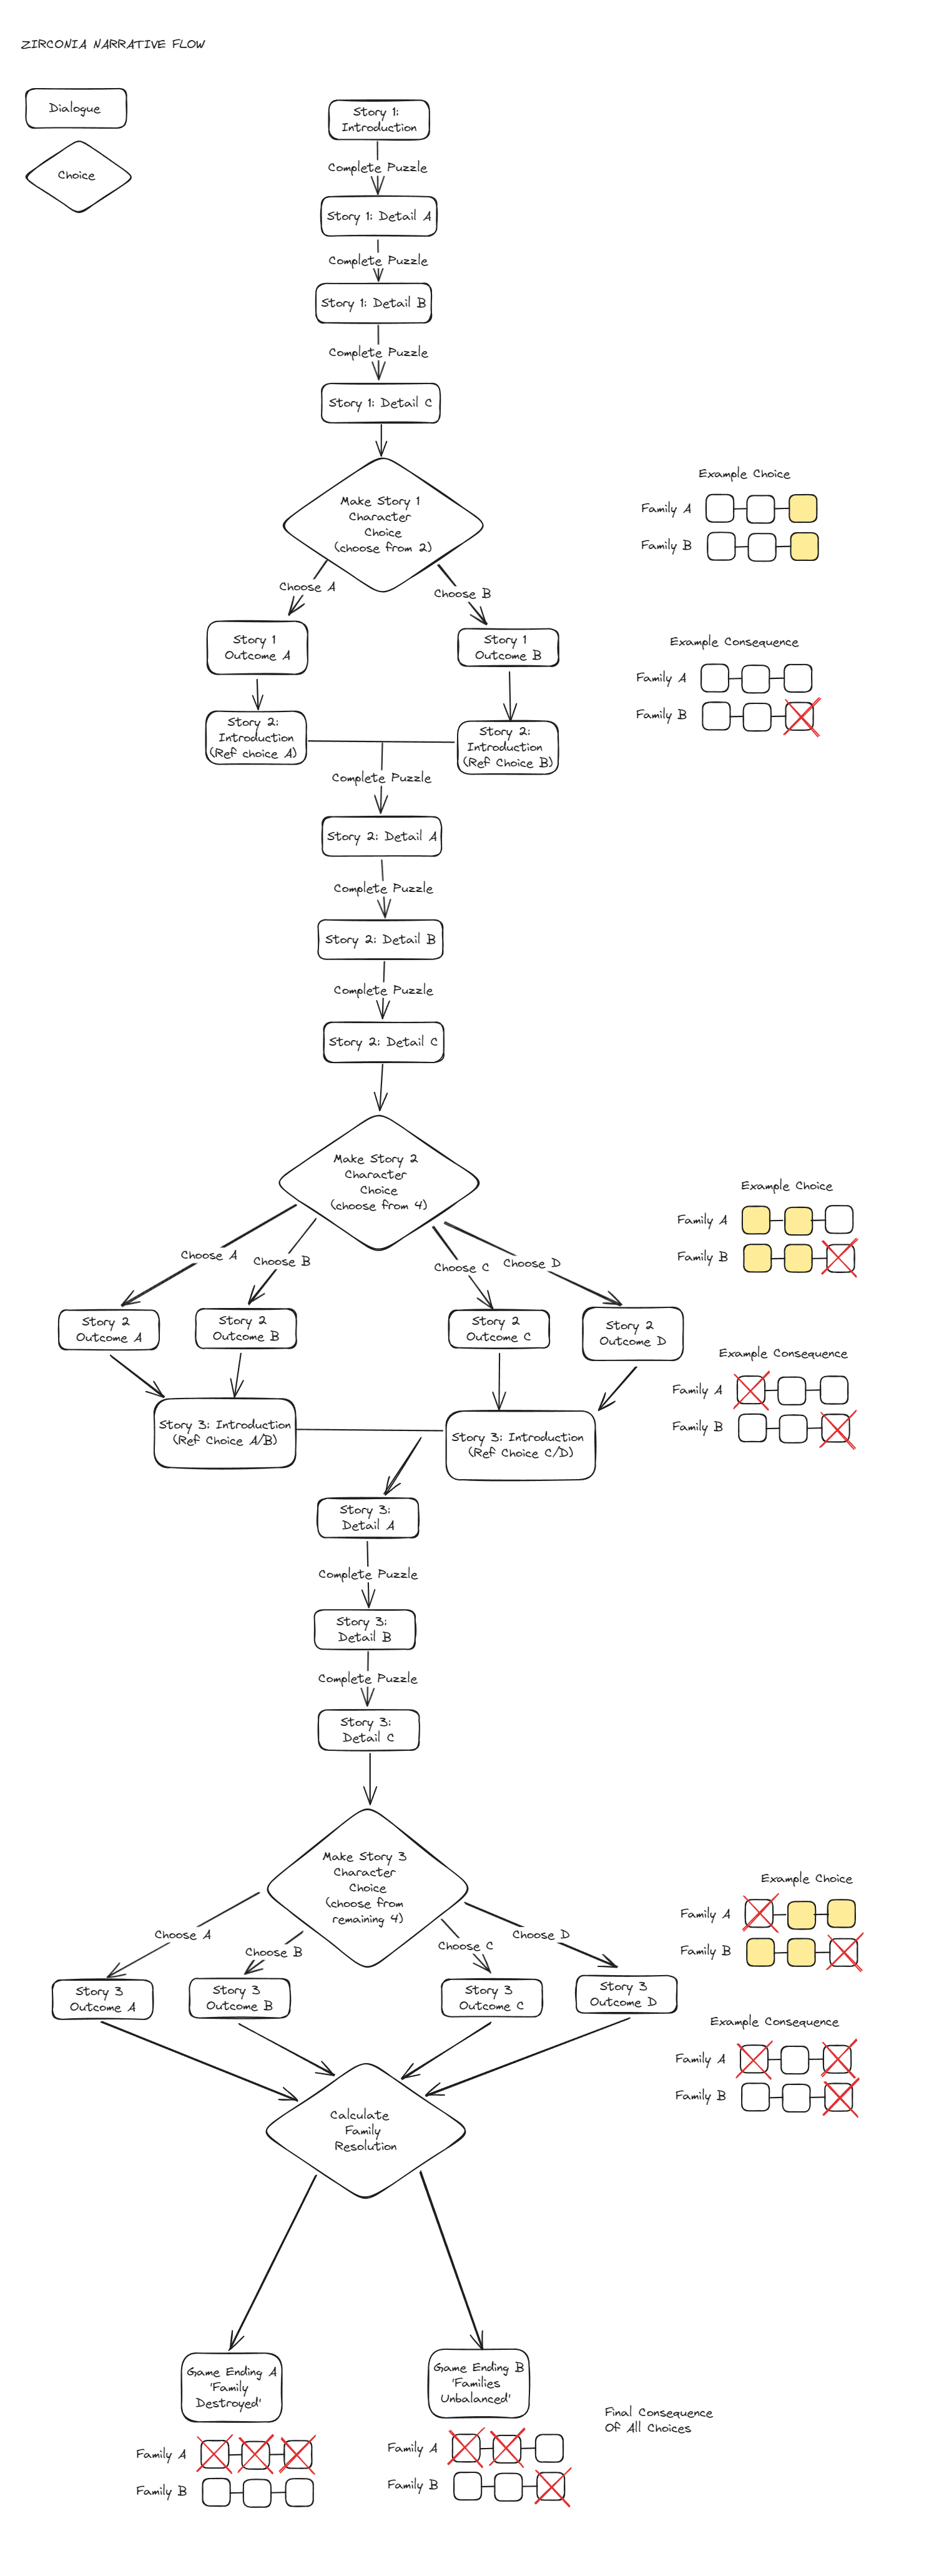
Ending / ‘Calculate Family Resolution’
When all choices are made, check which families have remaining active family members.
FOREACH Family
COUNT Number of Remaining Active Family Members

IF (Family A) OR (Family B) Members = 0
	Game Ending A 'Family Destroyed'
ELSE
	Game Ending B 'Families Unbalanced'
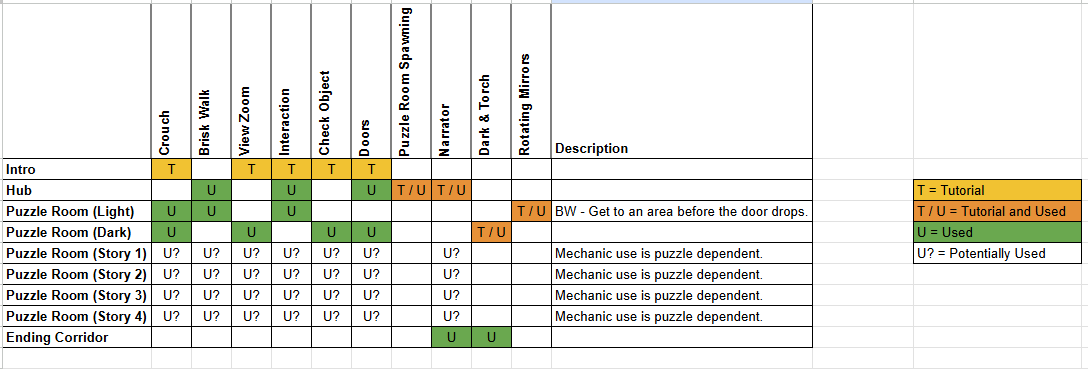
Mechanics Summary
| Name | Type | Summary |
|---|---|---|
| Crouch | Movement | Crouch to pass through environmental obstacles, and solve puzzles. |
| Fast Walk | Movement | Fast walk helps traverse the environment and solve puzzles. |
| View Zoom | Search & Interact | View Zoom allows the player to look closer at static props and geometry. |
| Interact | Search & Interact | Interact is used to immediately trigger a lever, or make a choice. |
| Check Object | Search & Interact | Some objects can be picked up and viewed. |
| Doors | World | Door are controlled by the World, not the Player. All doors all follow the same flow of states; Unlock, Open, Slam Shut & Lock. |
| Portcullis Door | World | A Portcullis Door is a unique type of door that has different properties to a standard door. |
| Narrator | World | Dialogue from the Narrator is the primary way the story is told. |
| Story Choice | World | On completion of a Puzzle Set, the player is guided back to the Character Portraits and asked to Interact with one of the Portraits to make a Story Choice. |
| Rotating Mirrors | Puzzle | Interact with levers on the mirror staffs to rotate between slots. |
| Torch & Dark | Puzzle | A timed challenge where the player navigates through a dark maze to find switches which are lit by bonfire light. |
Mechanics: Movement
Crouch
Crouch to pass through environmental obstacles, and solve puzzles.
Example Use Cases
- Look under a table to find hidden information.
- Duck under small gaps to progress further.
Active Contexts
- CAN Crouch then View Zoom.
- CAN Crouch then Interact.
- CAN Crouch then Check Object
- CAN Crouch when using a Torch.
- CANNOT Crouch when in Fast Walk.
Fast Walk
Fast walk helps traverse the environment and solve puzzles.
Example Use Cases
- A door is dropping down, use fast walk to get under it in time.
- After understanding the solution to a puzzle, speed up the completion of it.
- Get to the end of the Dark Puzzle Room before running out of time.
Active Contexts
- CAN Fast Walk with a Torch.
- CANNOT Fast Walk and Interact.
- CANNOT Fast Walk and Check Object.
- CANNOT Fast Walk and View Zoom.
- CANNOT Fast Walk when in Crouch.
Mechanics: Search & Interact
View Zoom
View Zoom allows the player to look closer at static props and geometry.
Example Use Cases
- Zoom into a letter on the wall to read it.
- Zoom into a static hero object and look at it.
- Find a crack in the wall, zoom in and see a symbol inside the crack.
Active Contexts
- CAN be used in Crouch state
- CAN be used while holding Torch in Dark & Torch state.
- CANNOT be used while in Fast Walk state.
- CANNOT be used in an Object Check state
Interact
Interact is used to immediately trigger a lever, or make a choice. Visually, interact will be signalled be a changing of the cursor when hovering over an interaction point.
Example Use Cases
- Pull a lever.
- Choose a character to end the story section.
- Rotate a Rotating Mirror in the Light Puzzle Room.
Active Contexts
- CAN be used in ‘Crouch’ state
- CAN be used while holding Torch in ‘Dark & Torch’ state.
- Cannot be used while in ‘Brisk Walk’ state.
- Cannot be used in an ‘Object Check’ state
Check Object
Some objects can be picked up and viewed.
- When picked up, the object fills the player view
- While viewing, the object can be rotated to view at all angles.
- Rotated by moving mouse while holding down
- The player cannot move while viewing
- Once they stop viewing the object returns to its original position.
Use Cases
- Pick up a note and read it to develop the story.
- Pick up a box, rotate to the back to reveal a number to solve a puzzle.
- Pick up a face down picture frame, rotate to see the picture.
Active Contexts
- CANNOT Check Object in View Zoom
- CANNOT Check Object in Fast Walk
- CANNOT Check Object and Interact
References
YouTube: ‘Read Note’ in Gone Home

Mechanics: World
Doors (All Types)
Door are controlled by the World, not the Player. All doors all follow the same flow of states.
Door have two types; Traditional and Magical.
Door Type Usage
Choose the door that fits the flow of the game.
- In the Hub, the player is always grounded in reality.
- Once the player steps through a door, they may step into a more magical and fantastical environment.
- The first room type the player enters will always be a ‘real world baseline’, i.e. it could feasible exist in reality.
- As the game loop progresses, it becomes clear to the player that when they go through doors (and travel down the elevator), they are being transported to another space and/or time.
Door States
Unlocked
- Player activates a trigger, e.g. pulls a level, triggers story dialogue.
- A loud sound will play from the doors location.
- Unlocked doors are shown using 3 light elements; a lit torch next to the door, and light emitting under the door.
Open
- Approach the door and it will Automatically Open Completely before you reach it.
- Doors always swing open towards the player.
Slam & Lock (Traditional Type)
- Go through the door and cross a trigger box threshold.
- The door will slam shut and lock behind you.
Disappearing Door (Magical Type)
- Go through the door.
- Turn around, and the door has vanished, the doorframe stands empty.
‘Traditional’ Door Type
Traditional doors feel familiar to the player.
| Description | Top Down View |
|---|---|
| For context, how a door acts when moving from the Hub to a Puzzle Room. | 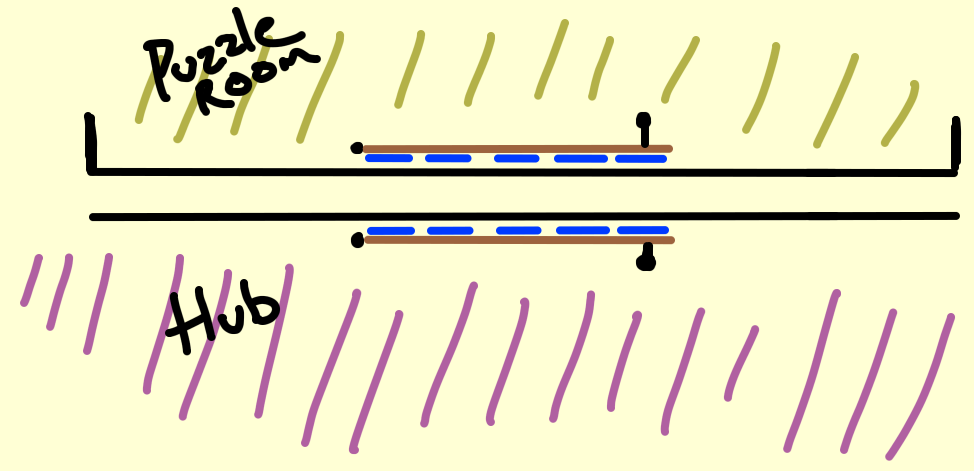 |
| Trigger zones outside both doors. Player steps into the trigger zone and the door opens. Note: Trigger zone in Hub MUCH larger than illustrated. |
 |
| Player steps through the door and teleports into the Puzzle Room. | 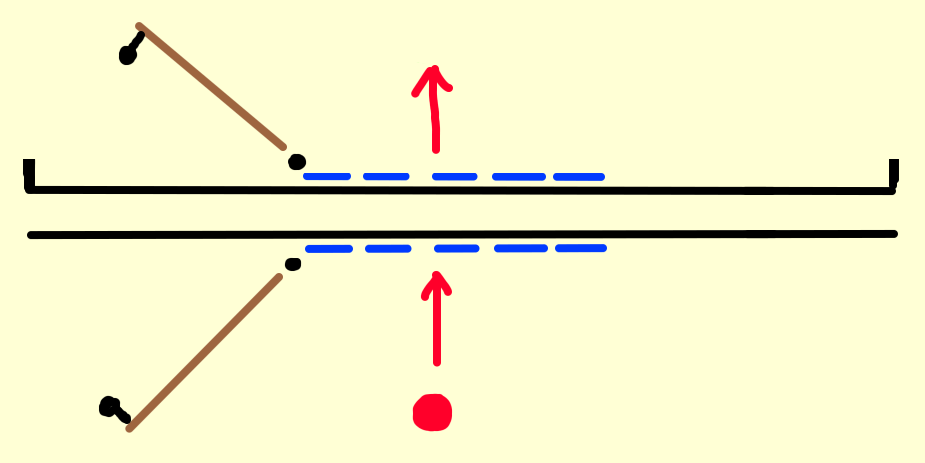 |
| Player steps outside the Puzzle Room trigger zone, and door slams shut. | 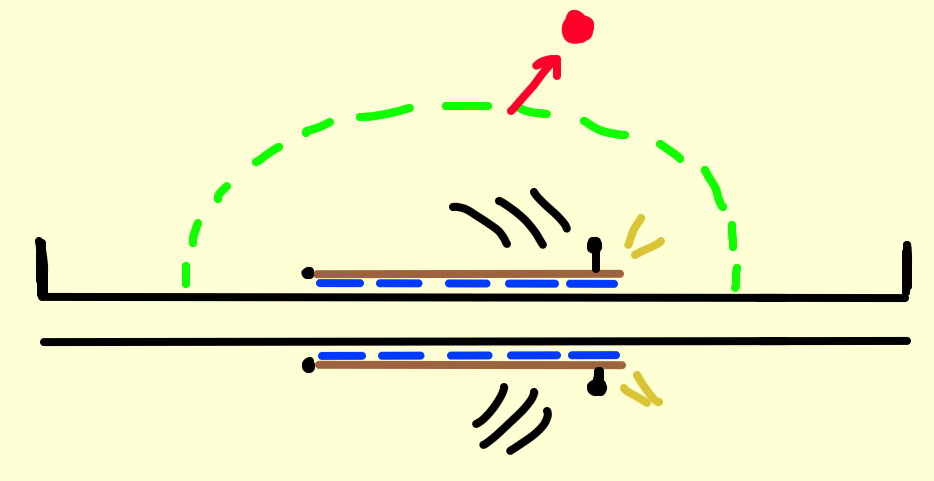 |
Door ‘Magical’ Type
A ‘Magical’ type door, with a ‘Traditional’ door inside the hub which leads out to a magical doorframe, with no surrounding wall.
| Description | Top Down View |
|---|---|
| Open automatically when player is in trigger zone. | 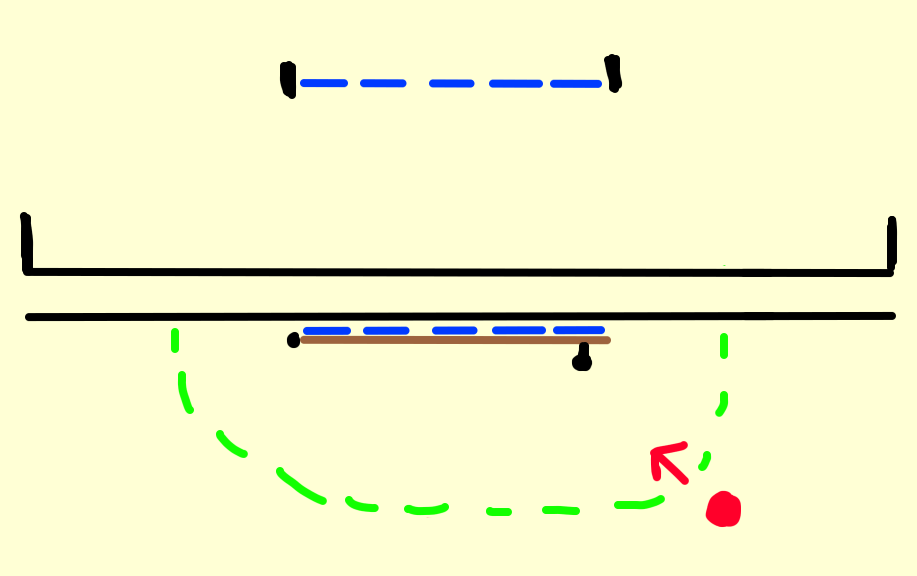 |
| Player steps through the door. | 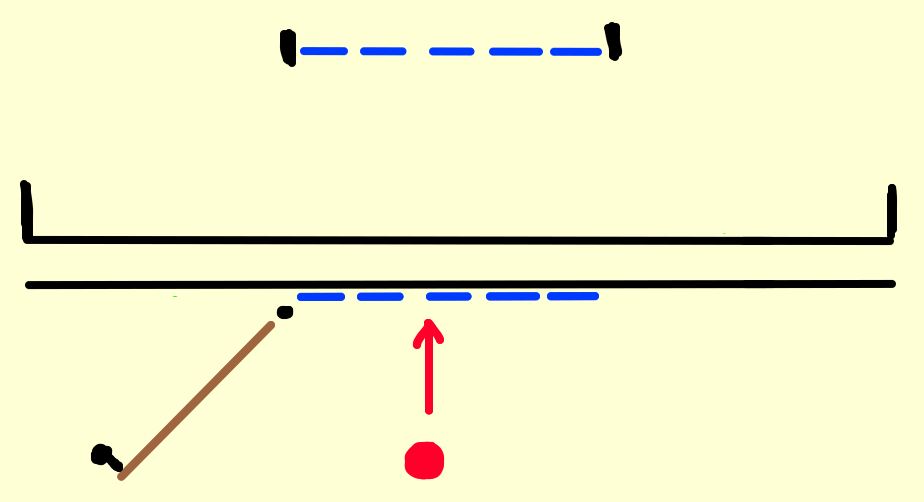 |
| Player turns around, the door frame is freestanding with no door / closed door. | 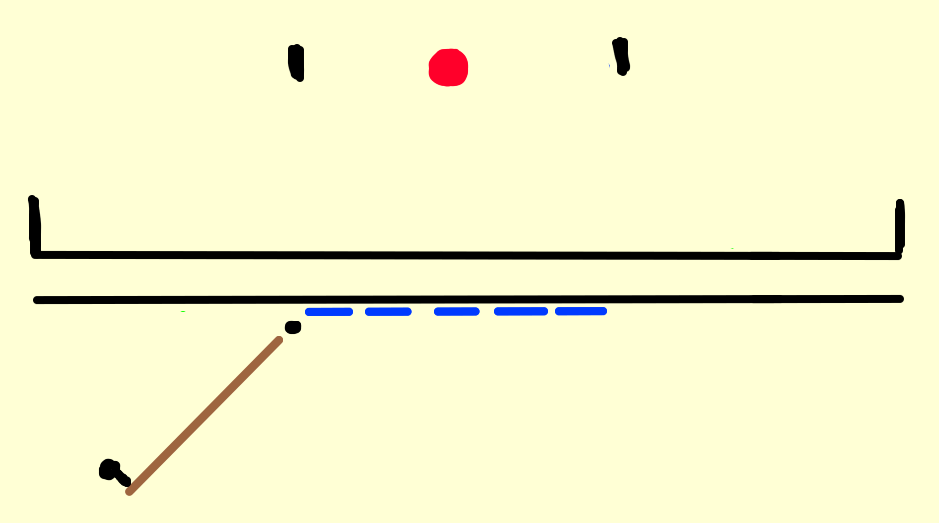 |
Note: When the puzzle is completed, the door either appears and opens, or opens.
| Magical Door Visual Example |
|---|
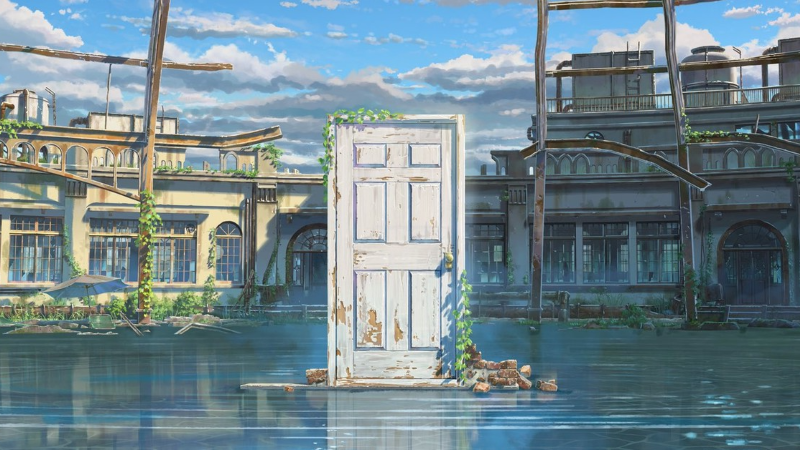 |
Portcullis Door (Slide Up & Drop Down)
A Portcullis Door is a unique type of door that has different properties to a standard door.
- The player can see through it.
- Light can travel through it (see Light puzzles)
- It can be opened in stages, while maintaining the same collision / blocking of the player.
A Portcullis Door is controlled by the World, not the Player.
Use Cases
- Can be opened slightly, but still block the player. Allows the player to pull a lever and see and hear puzzle progression, i.e. the portcullis slightly opening, while keeping them blocked.
- Allow the player to see beyond the door, but not travel there.
- Allow light from Rotating Mirrors to travel through, but not the player.
Narration
The narrator is the storyteller throughout the game. Narrative is always presented in audio and subtitle formats.
If the player wants to read back the narrative, they can hold down a button to display narrative history.
Use Cases
- Introduce the Story Loop.
- Add Story Detail when completing a Puzzle.
- Play Game Ending narrative.
Narrative Audio
Narrative audio is played in a ‘chunk’.
- A narrative audio chunk lasts for ~10 lines of dialogue.
- Narrative audio chunks are never split up, the subtitles are always synchronised to the audio.
- Once the chunk starts playing, it does not stop.
Narrative Subtitles
Two types of subtitle, a Heading and a Line.
Heading
- Heading are not accompanied by audio.
- Headings are always displayed alone, before the narrative starts.
- Headings displayed in the top left, then fade (see title screen for position and fade animation example).
- Example heading, ‘The Lovers’.
Line
Lines are the primary method of displaying subtitles.
- Lines are centred in the middle of the screen, at the top, synced to the audio.
- A line fades in quickly, then slowly fades out.
- Up to 3 lines can be displayed on screen at one time.
- A line of dialogue is never written to be longer than the length of the screen, i.e. it doesn’t wrap.
- A new line appears above the previous line, pushing the previous line down.
Syncing Narrative Audio and Subtitles
The Narrative System needs some variables the designer can adjust to keep the subtitles in sync with the audio, and so the player has enough time to read a line.
Variables are,
- Custom pause times between lines appearing.
- Custom fade out times for lines disappearing.
Narrative History
- The player holds down a button, and a history of all past Narrative Subtitles are displayed.
- Heading subtitles split sections of Line subtitles.
- Narrative history is presented in the same way as it appeared on screen, i.e. centred.
References
| Stanley Parable | Subtitles example… |
|---|---|
| YouTube Example | 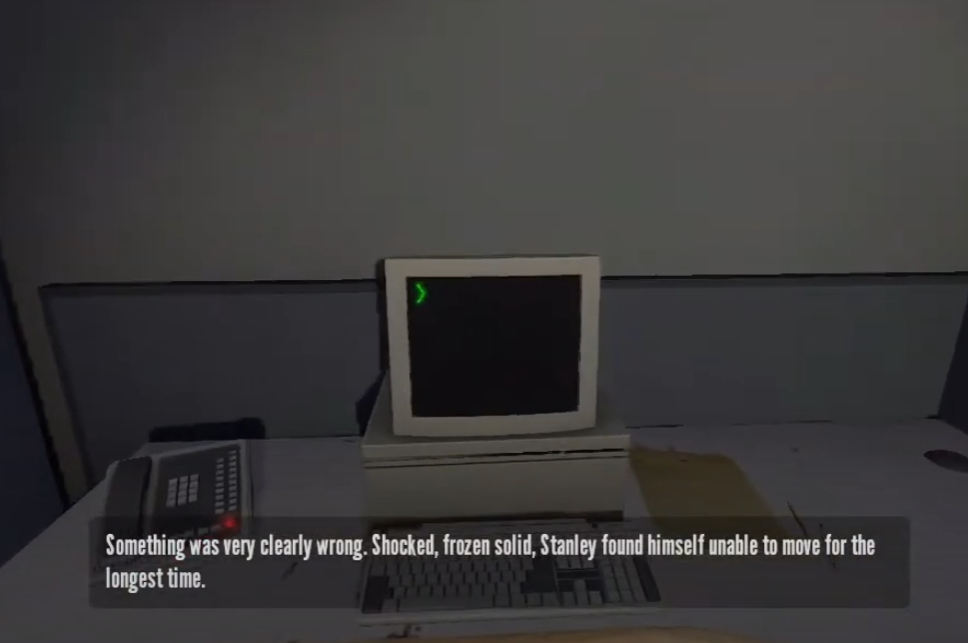 |
Story Choices
On completion of a Puzzle Set, the player is guided back to the Character Portraits and asked to Interact with one of the portraits to make a Story Choice.
- Story choices are recorded, and used to calculate the ending dialogue.
Mechanics: Puzzles
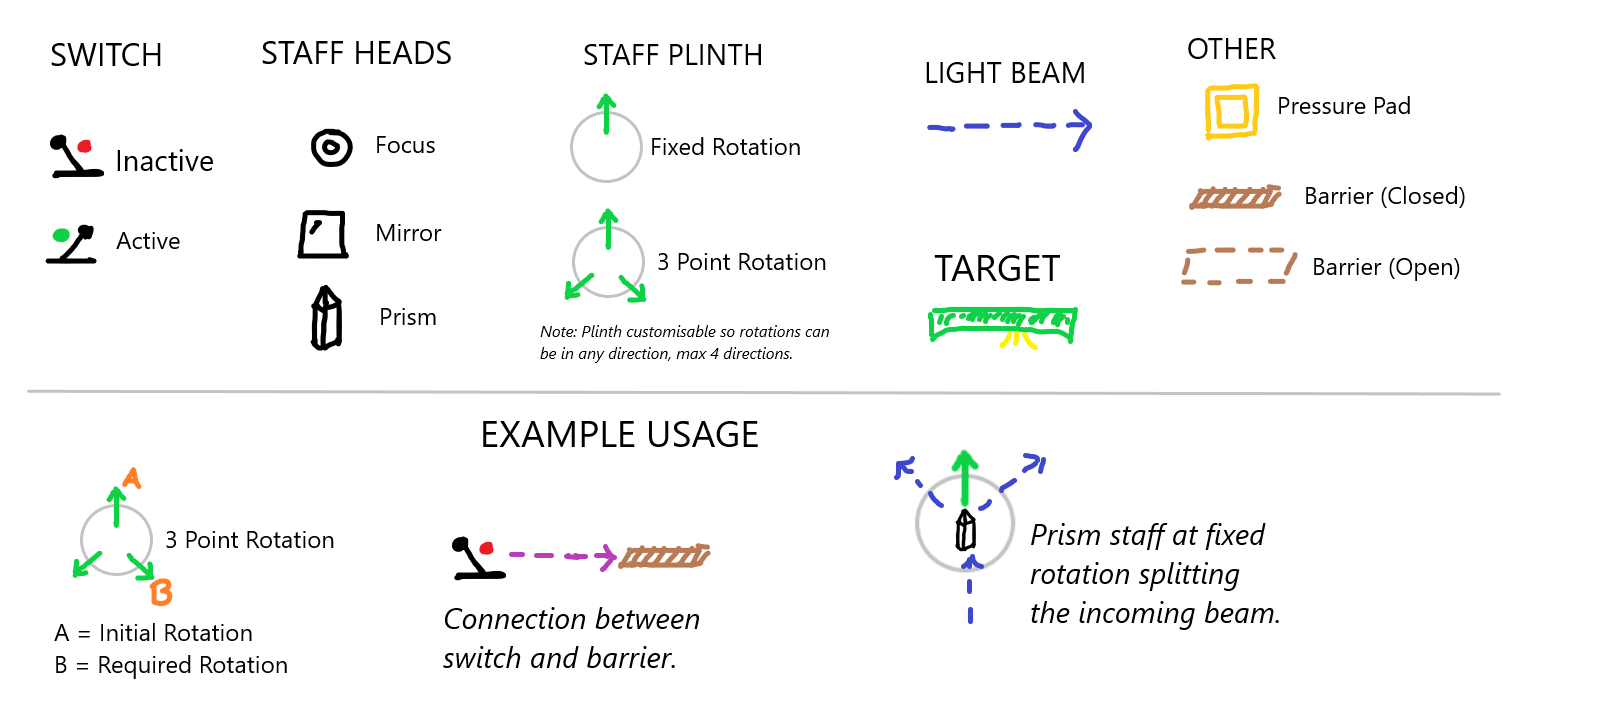
Rotating Mirror Staffs (Light Puzzle Rooms)
Interact with levers on the Staffs to rotate between slots on the Staff Plinth. The goal is to guide the light to a clear Target.
| Indiana Jones - Map Room | Visual |
|---|---|
| Indiana Jones Example | 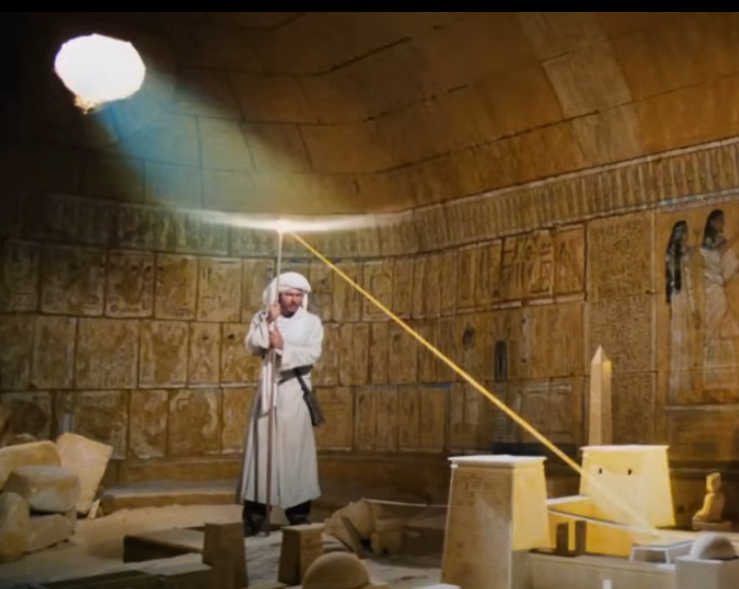 |
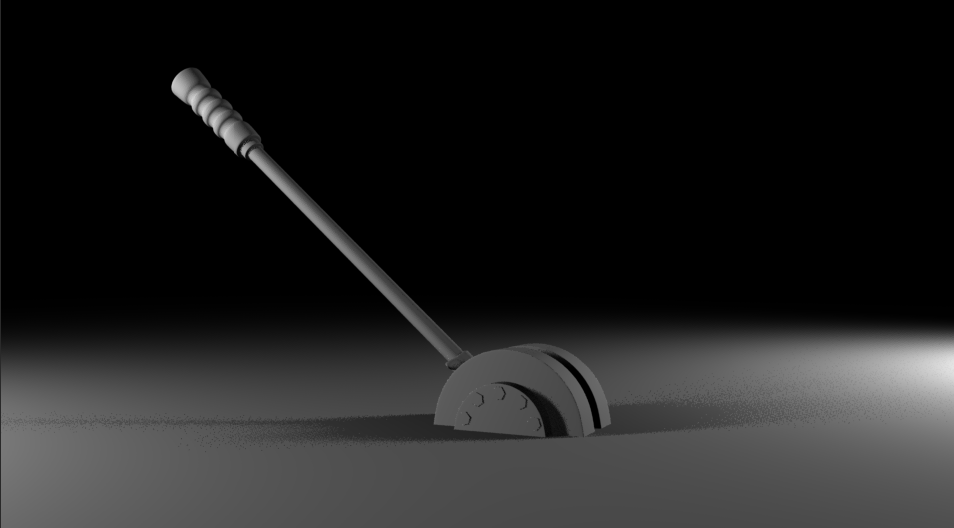
Anatomy of a Staff
A rotatable staff is the main mechanic in the light room puzzles.
It has a modular design; with a standard body, and an interchangeable head and plinth.
Staff Head
The Staff Head is interchangeable, there are 3 types; Focus, Mirror and Prism. These components are explained in a later section.
Staff Body
The Staff Body is always the same,
- Must have two rods perpendicular to the staff.
- Interacting with the rod will rotate clockwise, or anti-clockwise.
- The player will always push the rod to rotate.
- When play clicks interact on the rod, and the staff rotates automatically.
| Description | Visual |
|---|---|
| A rod perpendicular to the staff allows the player to rotate the staff clockwise and anti-clockwise. | 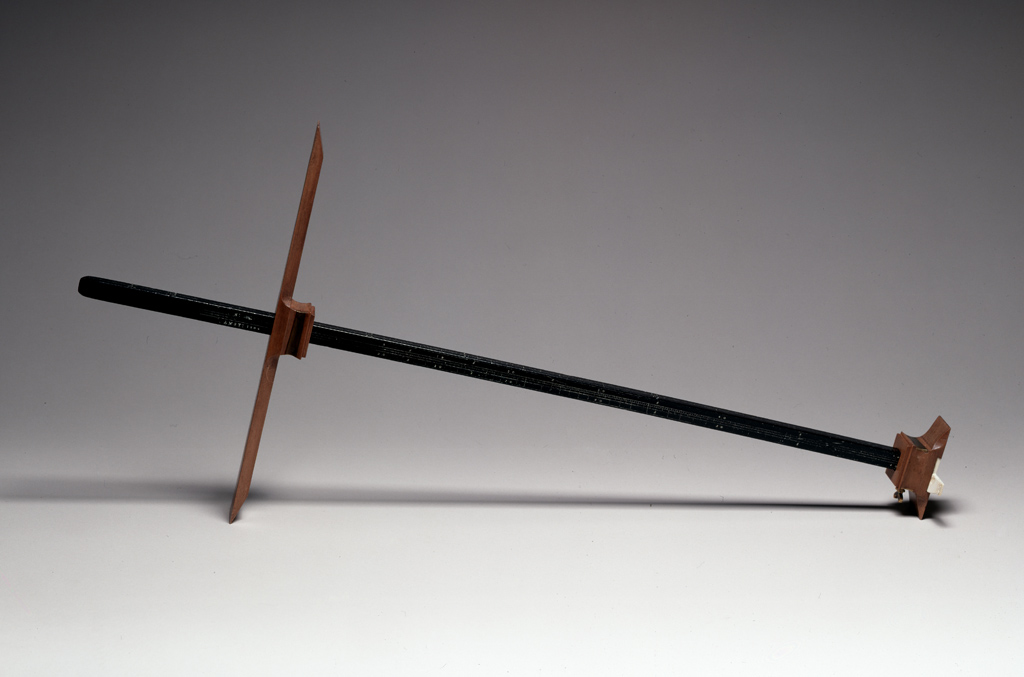 |
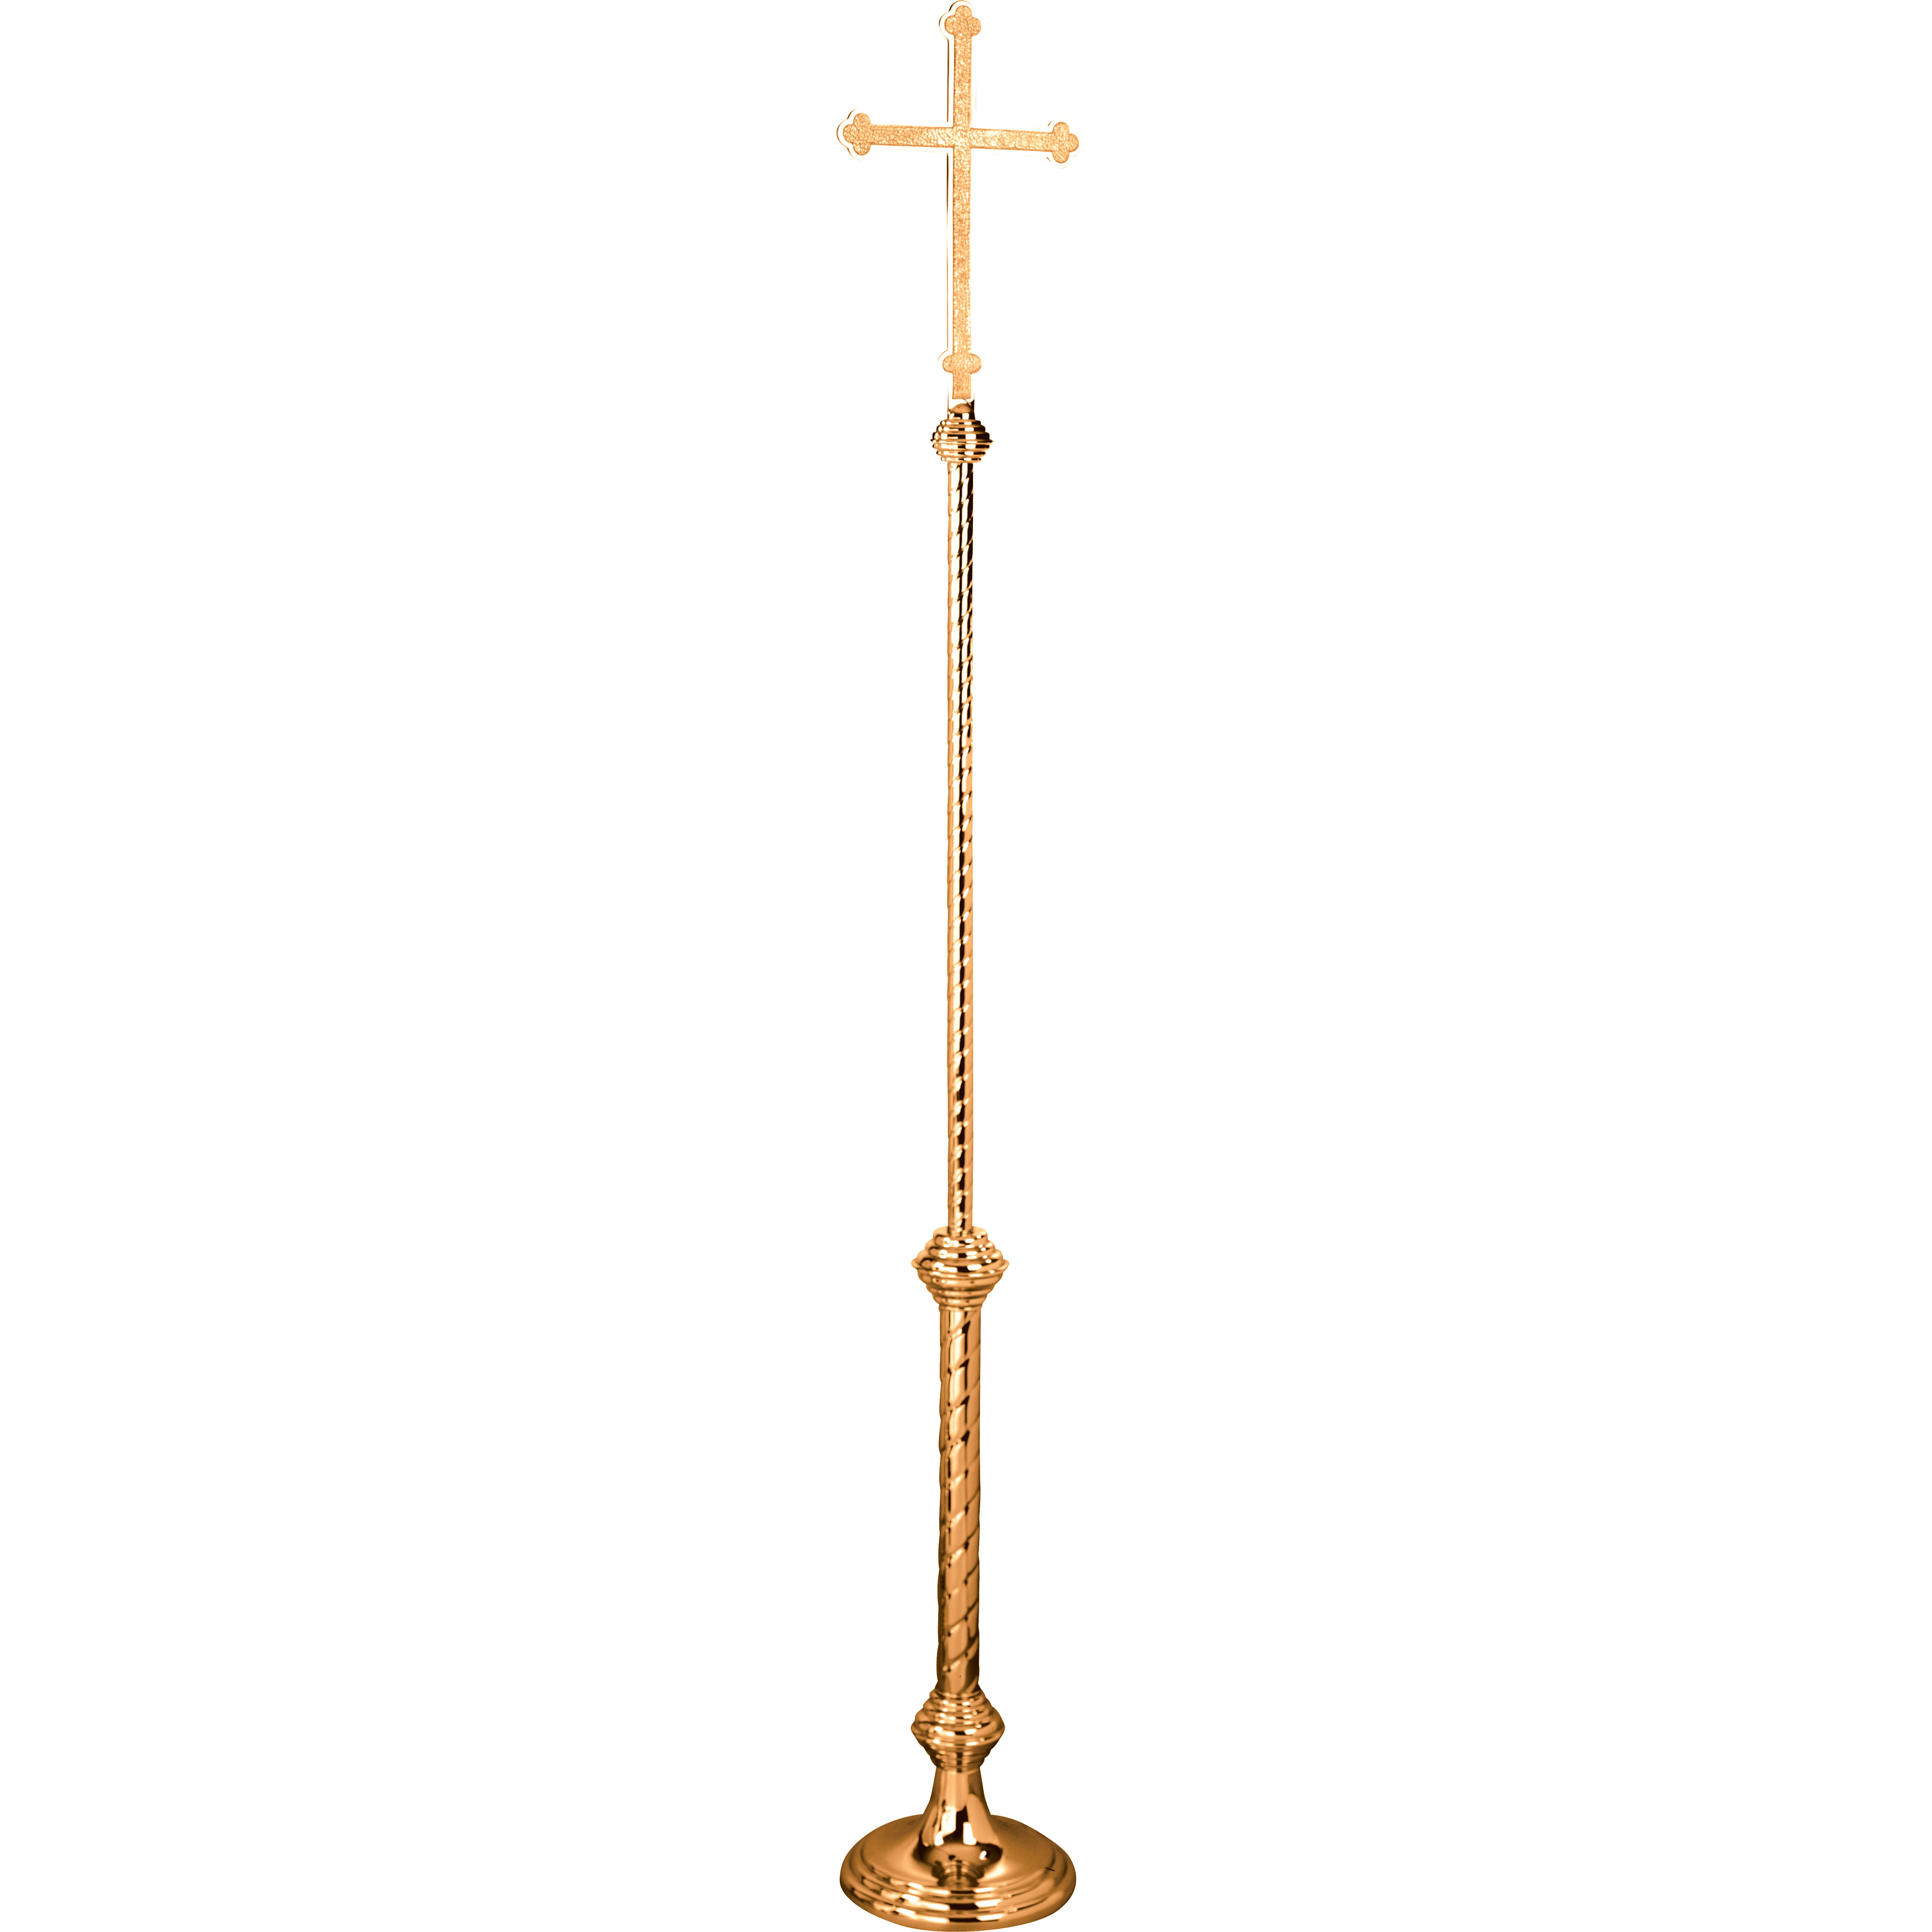
| Staff could be wooden, or ornate gold. Head of the staff can be swapped out. NOTE: No direct religious symbols, so no crucifix here. |
 |
Staff Plinth
The staff plinth shows the direction the staff can be rotated towards, and the direction the beam of light will be sent.
- Plinth has the direction of the beams etched in.
- Plinth should be customisable prop, based on puzzle requirement.
Example of customisation,
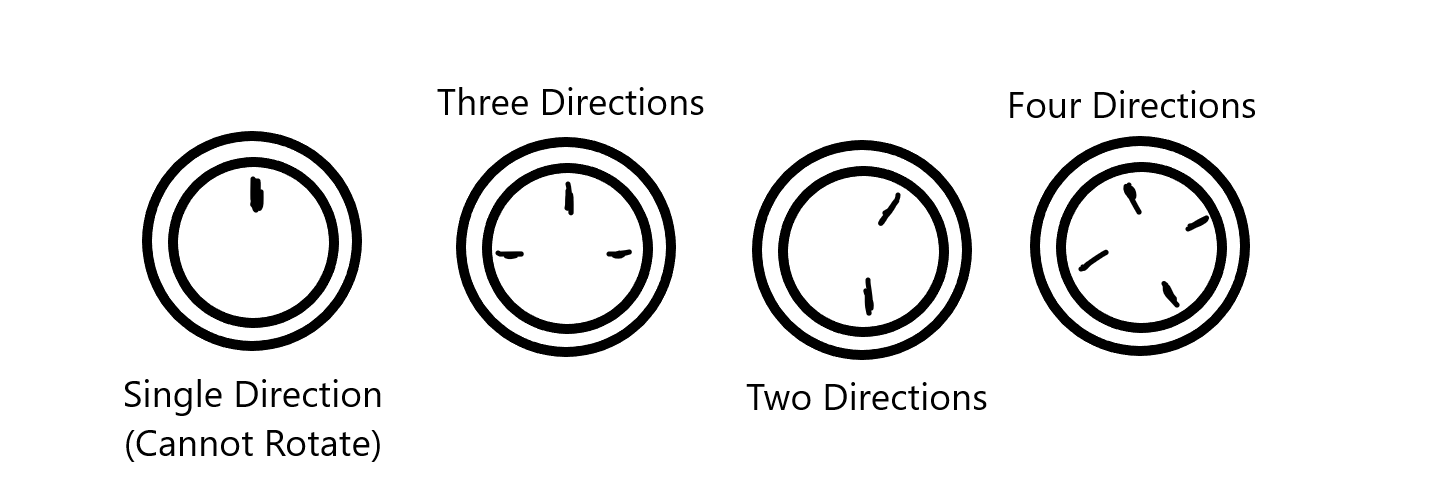
NOTE: Designer can place direction etchings anyway and staff will rotate to those points.
| Example Plinth |
|---|
 |
Staff Heads
Focus Staff with Frensel Lens
- When light shines on this staff, it is focused and a light beam emits from the staff head.
- Light shines down onto the focus staff, and a beam is emitted from it which follows the arrow on the Staff Plinth.
- Fresnel lens - Wikipedia
| Example Focus Staff head |
|---|
 |
Rotating Mirror
- The mirror diverts the light beam.
- The mirror is square to differentiate it from the Focus Lens (circular) and the Prism.
- Mirror is square, but could be presented in a diamond shape.
| Square Mirrors |
|---|
 |
Rotating Prism
- When light hits the prism, it splits the light into into two.
- Light is diverting it at 45 degrees and -45 degrees from the light input angle.
| Example Prism Staff head |
|---|
 |
Light Beam Target
Target is a framed painting which shows parts of the story.
The Light Beam Target can be hidden or blocked, requiring a trigger (Switch or Pressure Pad) to be activated before the beam can hit it.
Other Mechanics Included in Puzzles
Pressure Pad
- Stand on to trigger something.
- Moving off the pressure pad releases the trigger.
Light Blocker
- Blocks the light beam.
- May be triggered by a lever.
- May be triggered by a light beam hitting a painting.
- May have to hold down a pressure pad.
Crouch / Player Blocking
- Player will block the light if standing in the wrong place.
- Use in combination with the pressure pad for a puzzle red herring.
Fast Walk
- Get under a portcullis before it drops.
Portcullis
- Light can pass through the portcullis, the player cannot.
Dark & Torch (Dark Puzzle Room)
A timed challenge where the player navigates through a dark maze to find switches which are lit by bonfire light.
Maze Introduction
- The player steps onto the circular lift where there is a torch. They click to pick up the torch, and the lift starts descending.
- As soon as the player picks up the torch, they are locked onto the lift.
- The player descends on a circular lift into the middle of the maze.
- On descent, the player has a 360 degree view of the maze.
- On descent, the player can see bright bonfires that mark the location of the switches.
Maze Features
- The player starts on a risen platform in the middle of the maze, with the bonfires visible.
- Moving down the platform into the maze starts a timer, the player has limited time in the dark.
- When the player is out of time, they pass out and return to the raised platform at the start of the maze.
- The maze has psychological horror elements.
Maze Exploration
- The maze grows in size based on difficulty.
- Larger mazes have a higher number of switches to find.
- The maze does not have wall boundaries, it has a wall of fog. If the player enters the wall of fog, they will pass out and fail.
- When the player reaches a bonfire & switch, there’s environmental storytelling under the bonfire, and a rest for the player.
Switch
- The switch is pulled once, and then is locked in place.
- A mechanical, gear and cog rotating sound echoes around the level when the switch is pulled.
Bonfire
A vertical bonfire marks the location of the switches.

| Difficulty | Maze Size | # Switches | Switch Locations | Layout Change |
|---|---|---|---|---|
| Story 1 | Small | 2 | Static | No |
| Story 2 | Medium | 4 | Static | No |
| Story 3 | Large | 6 | Random | Yes |
Maze Descent Concept
As the lift descends, the player can clearly see the bonfires, until they reach the bottom…
Maze ‘Safe Zone’ Concept
The lift lands in a risen safe zone. The player can return to here to get away from the dark, and spot the next bonfire.
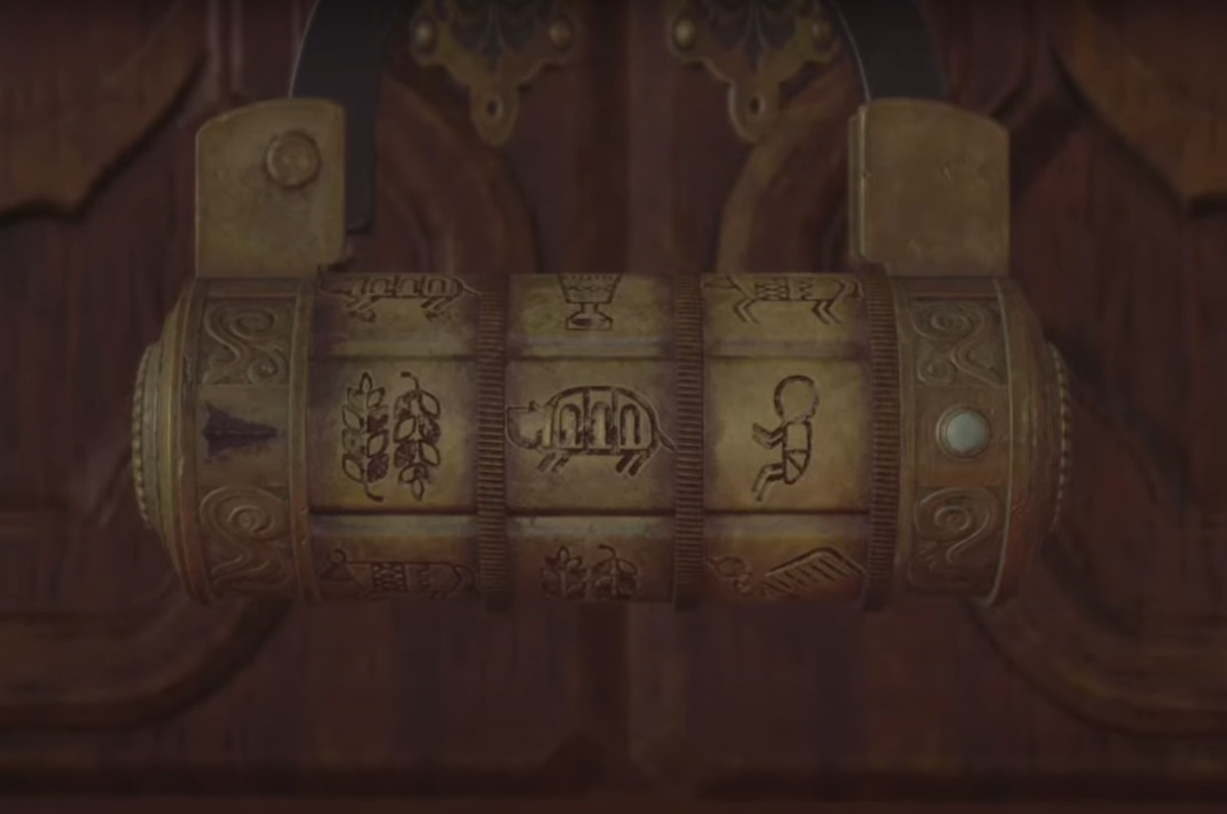
Rotating Symbols
Completing the Story puzzles requires the player to input a combination of symbols into a mechanism.
- Symbols on each ring are unique.
- Players find symbols around the Story Puzzle Room.
Mechanics Teaching
Below is a table outlining where the core mechanics of the game are taught and used.
Additional Mechanics (Out of Scope)
Additional mechanics that are ‘Nice To Have’. The game can operate without these.
Prop Fidget System
- Static props move while the player isn’t looking.
- Prop transformations would be subtle; rotation, slight movement.
- Props could be given physics properties and drop to the floor to make a sound.
Door Ajar
- A door in the ‘Open’ state is slightly ajar, letting light through.
- Wind whistles through the ajar door.
Dictate Letter
- The player interacts with a letter using the Check Object system
- They can read it, or click a button for the Narrator to read it aloud.
- The narrator will continue reading even after the letter has been put down.
Ref: Audio Diaries in Bioshock.
UI Design
Note: UI implementation was done by the designer, and was missing frin the design document. Similar games limit their UI for the sake of immersion, and where UI was required it was made diegetic.
Control Design
Look
Vertical Look
- Semi-Restricted.
- Character can look directly up, but is clamped when looking down.
- See Return of the Obra Dinn for reference.
Movement Speed
- Default walk is a slow plod, heavy up & down head bob.
- Fast Walk speeds up character.
- Movement speed slows on stairs, cannot fast walk on stairs.
Crouch
- Initial drop is quick, ease the end of the drop.
- Low crouch, see Gone Home for reference.
- Options for hold and toggle crouch, hold takes priority.
View Zoom
- Hold to Zoom.
- Initial zoom is quick, slower ease at the end of the zoom (see Motion Design section).
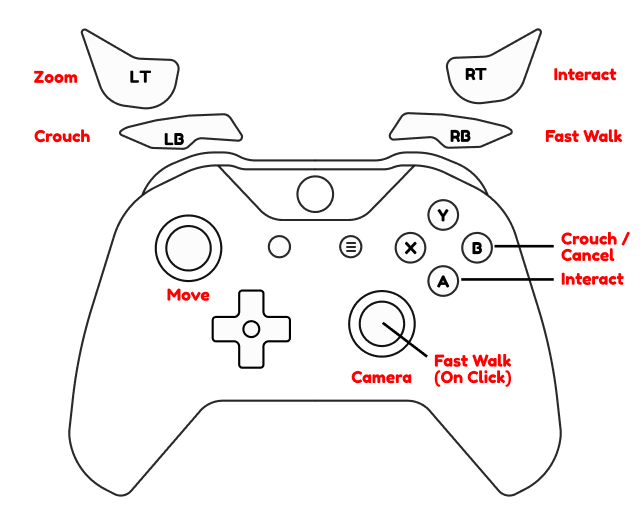
Keyboard & Mouse
First draft of KBM controls.
| Mechanic | Primary Key | Alt Key | Note |
|---|---|---|---|
| Interact | Mouse Left (Click) | E | Click to cancel Check Object mode |
| Move | WASD (Hold) | Arrow Keys | |
| Crouch | Ctrl (Hold) | C | |
| Fast Walk | Shift (Hold) | ||
| View Zoom | Mouse Right (Hold) | Q | Hold to rotate object in Check Object mode |
| Narration History | Tab (Hold) |
Pad
First draft of pad controls.
Motion Design
See ‘World Tone’ section for high level motion design.
- Avoid linear motion!
- Prefer slower motions to quick motions.
- Interacting with old, rusted machinery. Mechanisms require force to initially propel / ‘unstick’ them.
Levels & Descriptions
| Area Name | Description |
|---|---|
| Introduction | The starting room of the game. Used to teach Core Mechanics. |
| Hub | Main room, player will; learn the story, make a character choices, enter puzzle rooms, return on puzzle completion, awake here after failing the ‘Dark’ puzzle room. |
| Light Puzzle Room (Easy, Medium, Hard) | Direct a beam of light to bounce between mirrors and hit a target. Rooms get more complex as the story moves forward. |
| Dark Puzzle Room (Easy, Medium, Hard) | Using a torch, search for hidden levers in a dark maze before the time runs out. If the time runs out, you pass out and awaken facing the puzzle room door to try again. |
| Story Puzzle Room (x3) | Easy puzzle, which expands on the lore of the world. |
| Ending Corridor | The final corridor of the game where the ending narrative dialogue is played. The player walks down a dark corridor, into the light. |
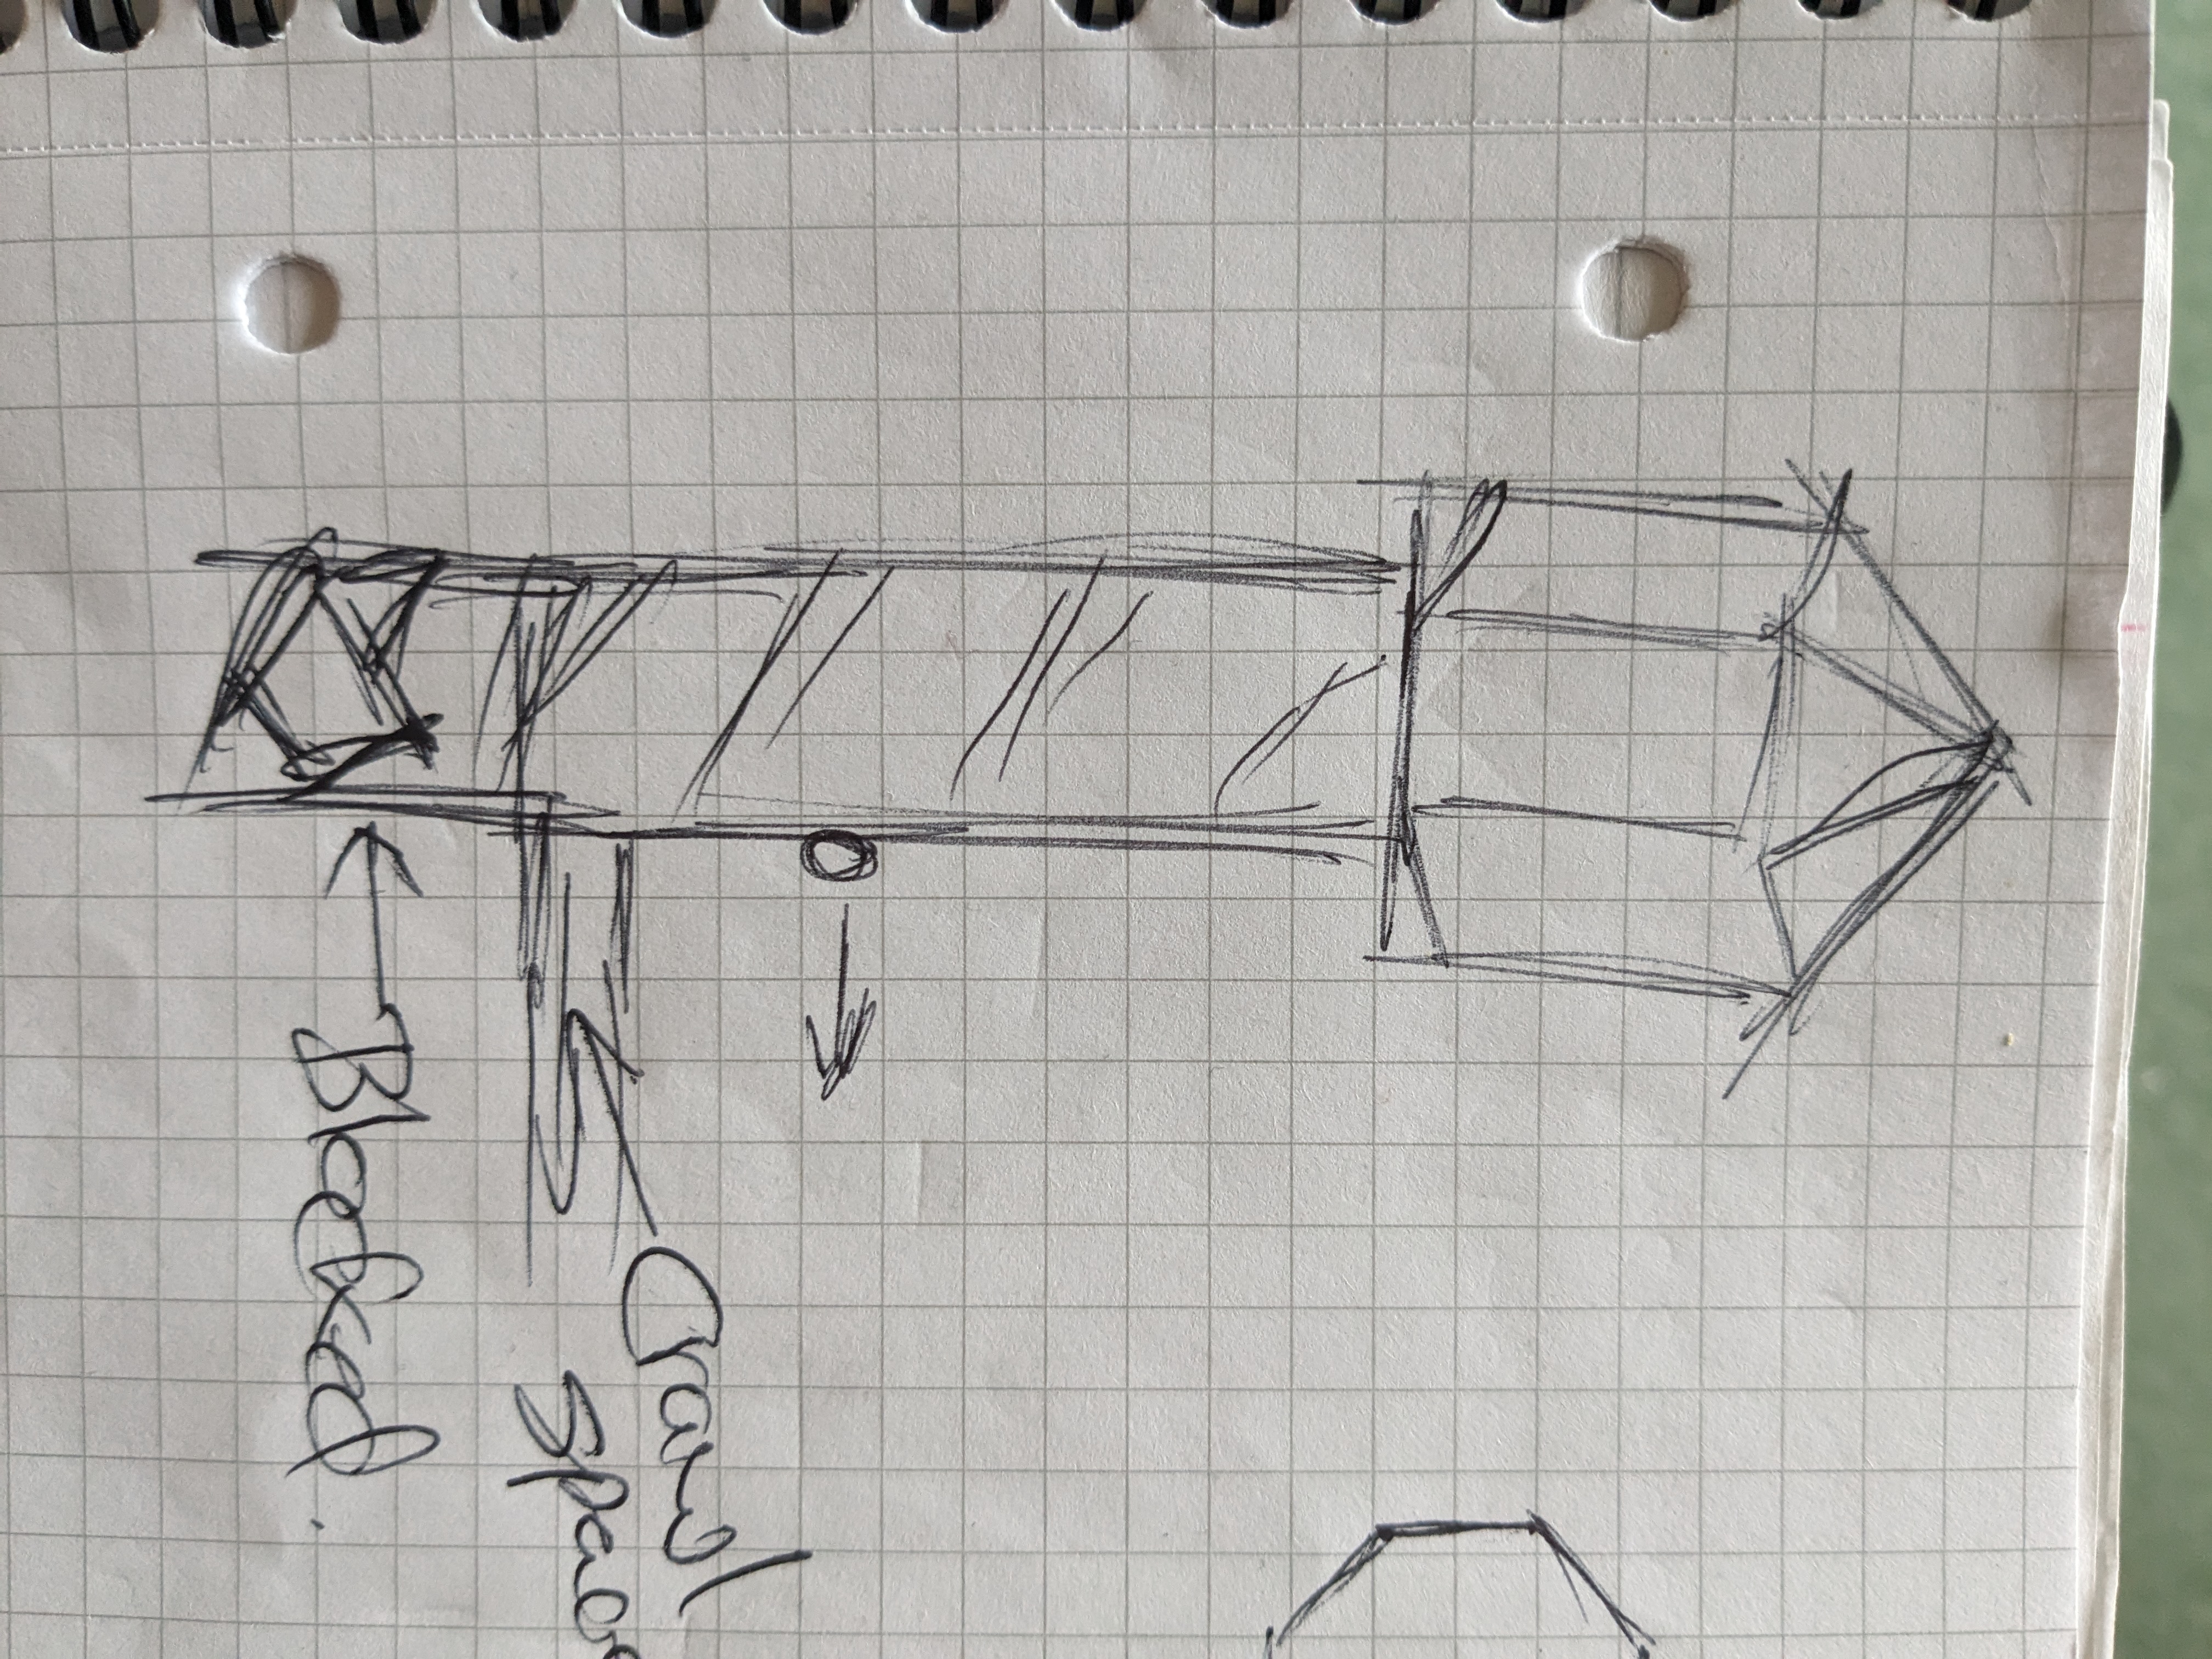
Level Design: Introduction
Introduction scene is a sparsely furnished study at the top of a tower.
Level Flow (Step by Step)
- The player is required to learn the Interact, Check Object and Doors mechanics before moving forward.
- They exit the room through a door, onto a closed spiral staircase, lit by torches.
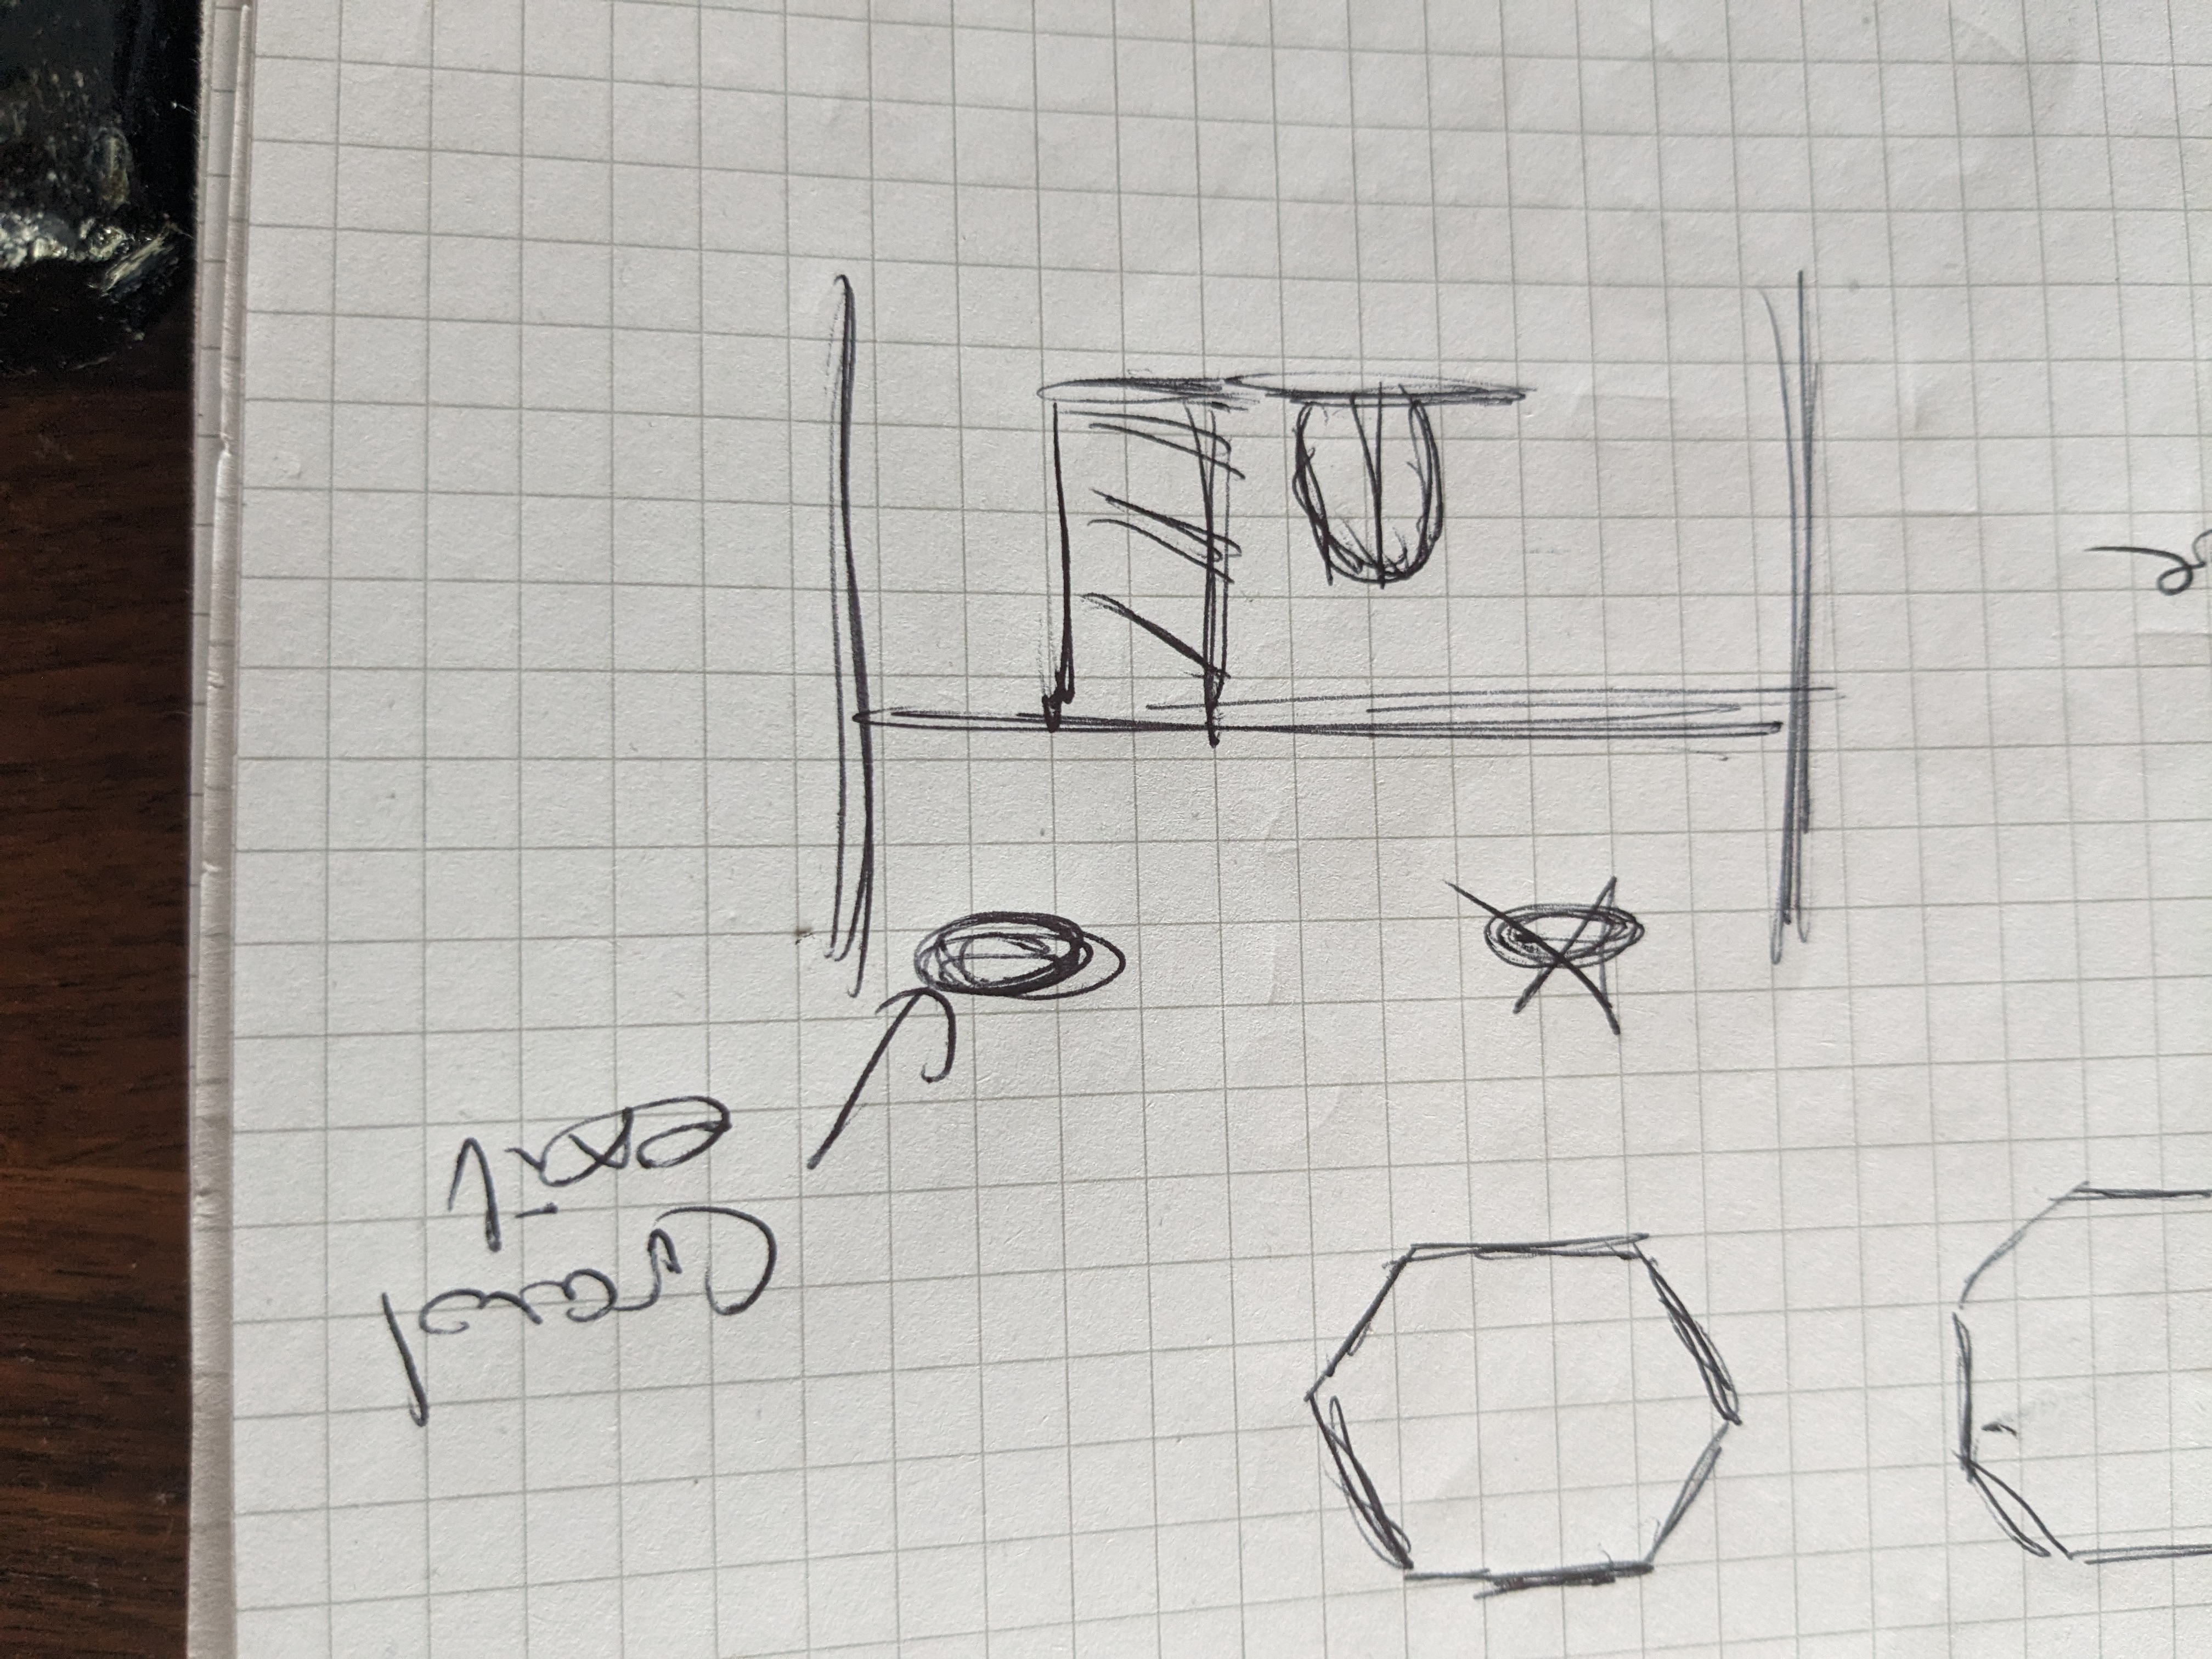
- On their descent, there is a crack in the wall, they use the Zoom View mechanic to peer into the Hub.
- The staircase is blocked at the bottom.
- The player walks back up the staircase, and notices a crawlspace in the wall. The player crouches and can enter the crawlspace.
- The player drops down onto the first level of the Hub.
| Study (Top Down) | Spiral Staircase (Side On) | Intro Exit / Hub 1st Floor (Front) |
|---|---|---|
 |
 |
 |
Level Design: Hub
The hub is a large, open space, where the player accesses puzzles and is told the the story.
Level Flow (Step by Step)
- The player walks up to the sword at the end of the room.
- The story intro triggers, and this begins the Game Loop.
- {Player goes through the game loop}
- The player completes the game loop, makes their final choice, and the doors open.
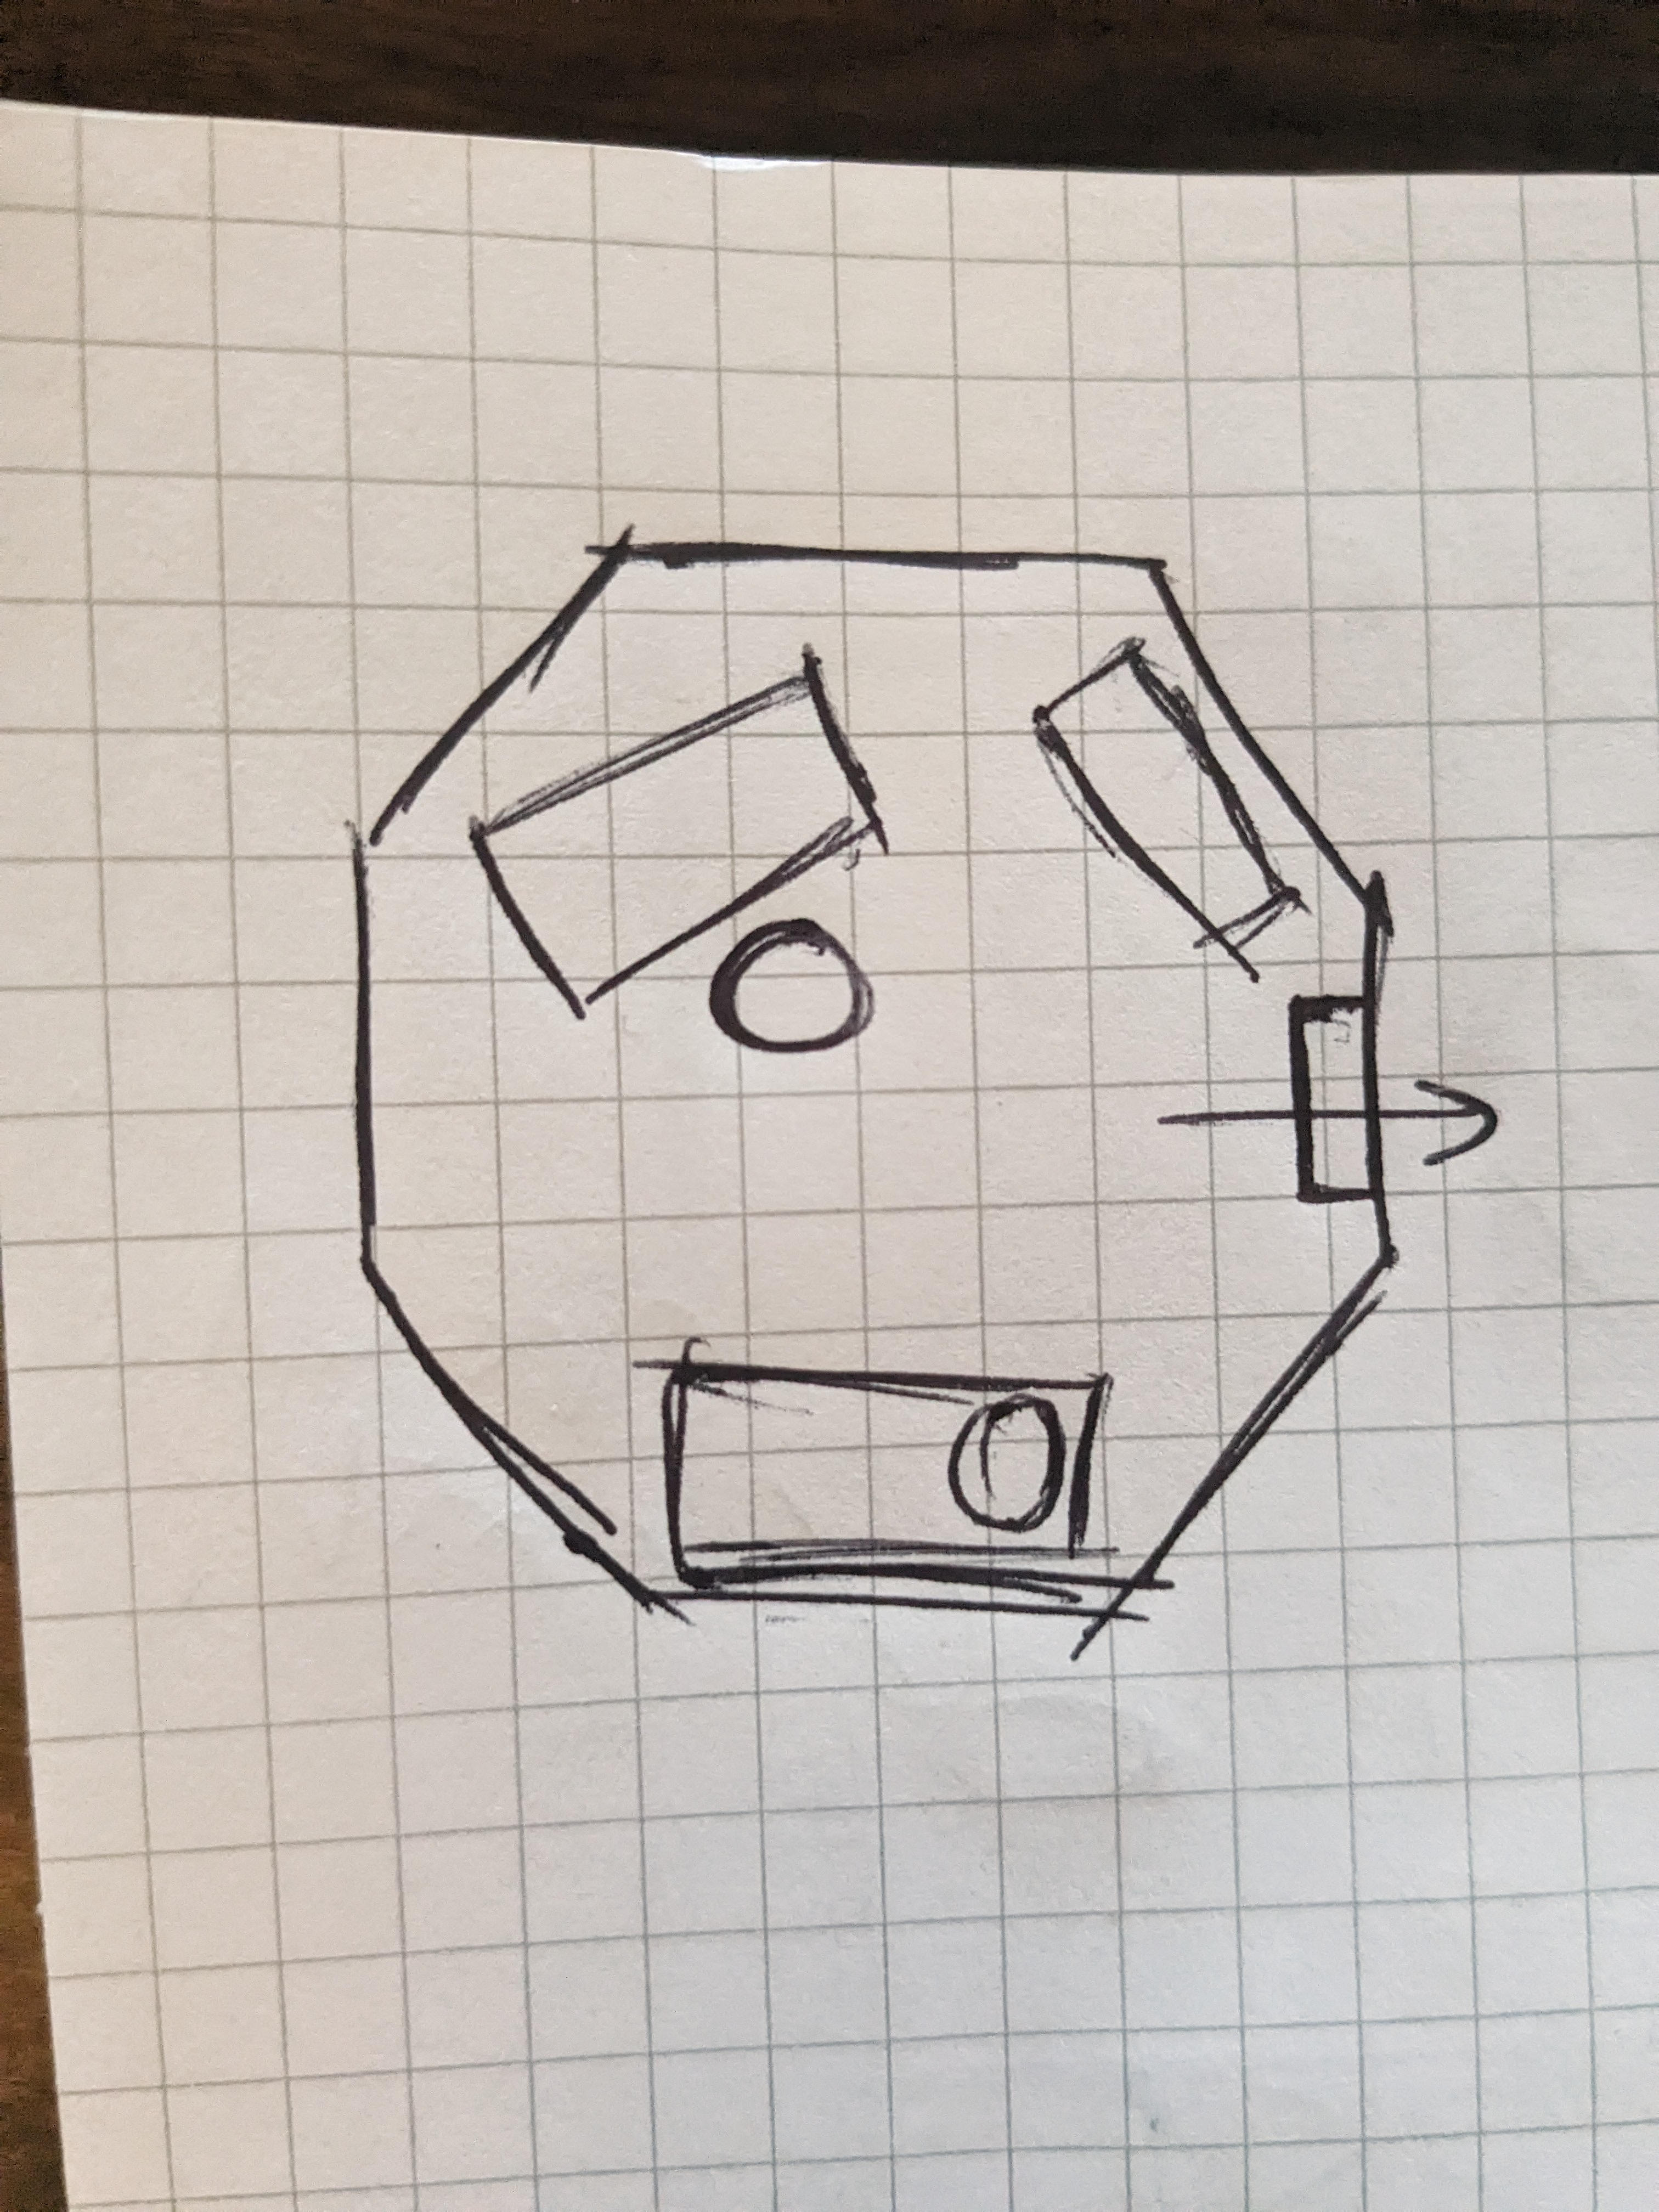
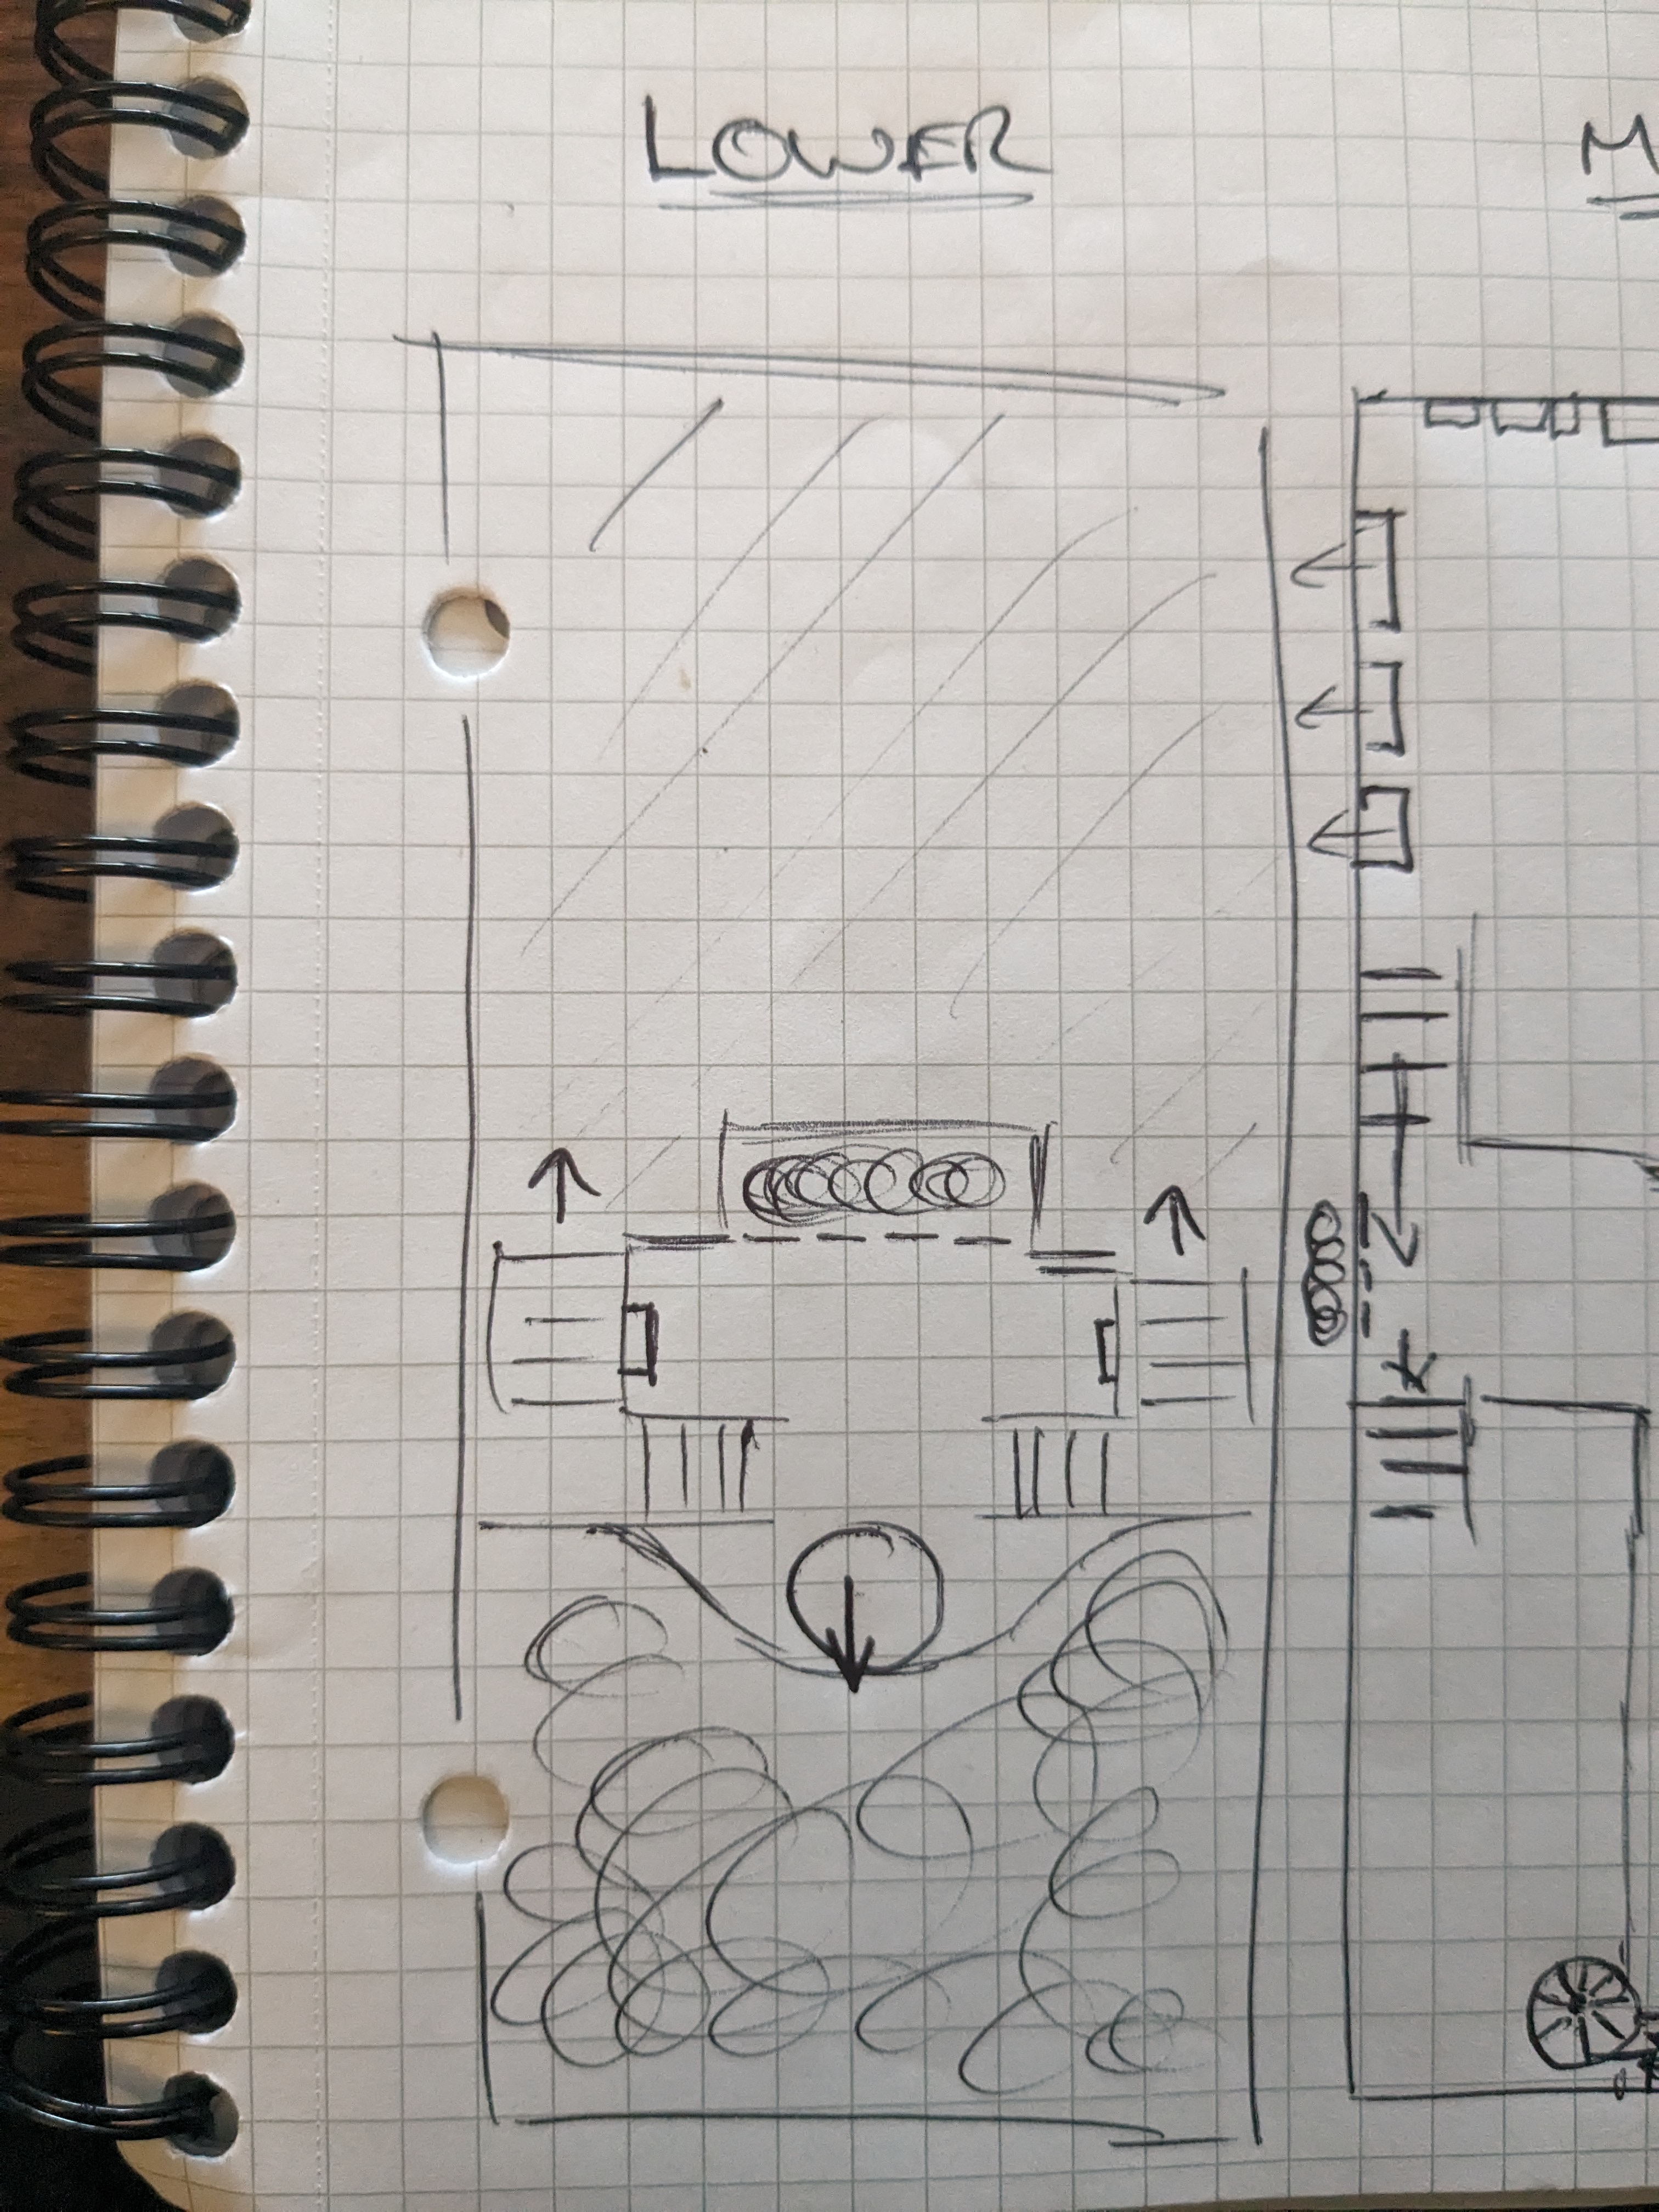
Top Down Map
The Hub is split by verticality, and access to puzzle rooms is grouped into these 3 levels,
LOWER - 1 Dark Elevator
MIDDLE - 6 Story Puzzle Room Doors
UPPER - 6 Light Puzzle Room Doors
| LOWER | MIDDLE | UPPER |
|---|---|---|
 |
 |
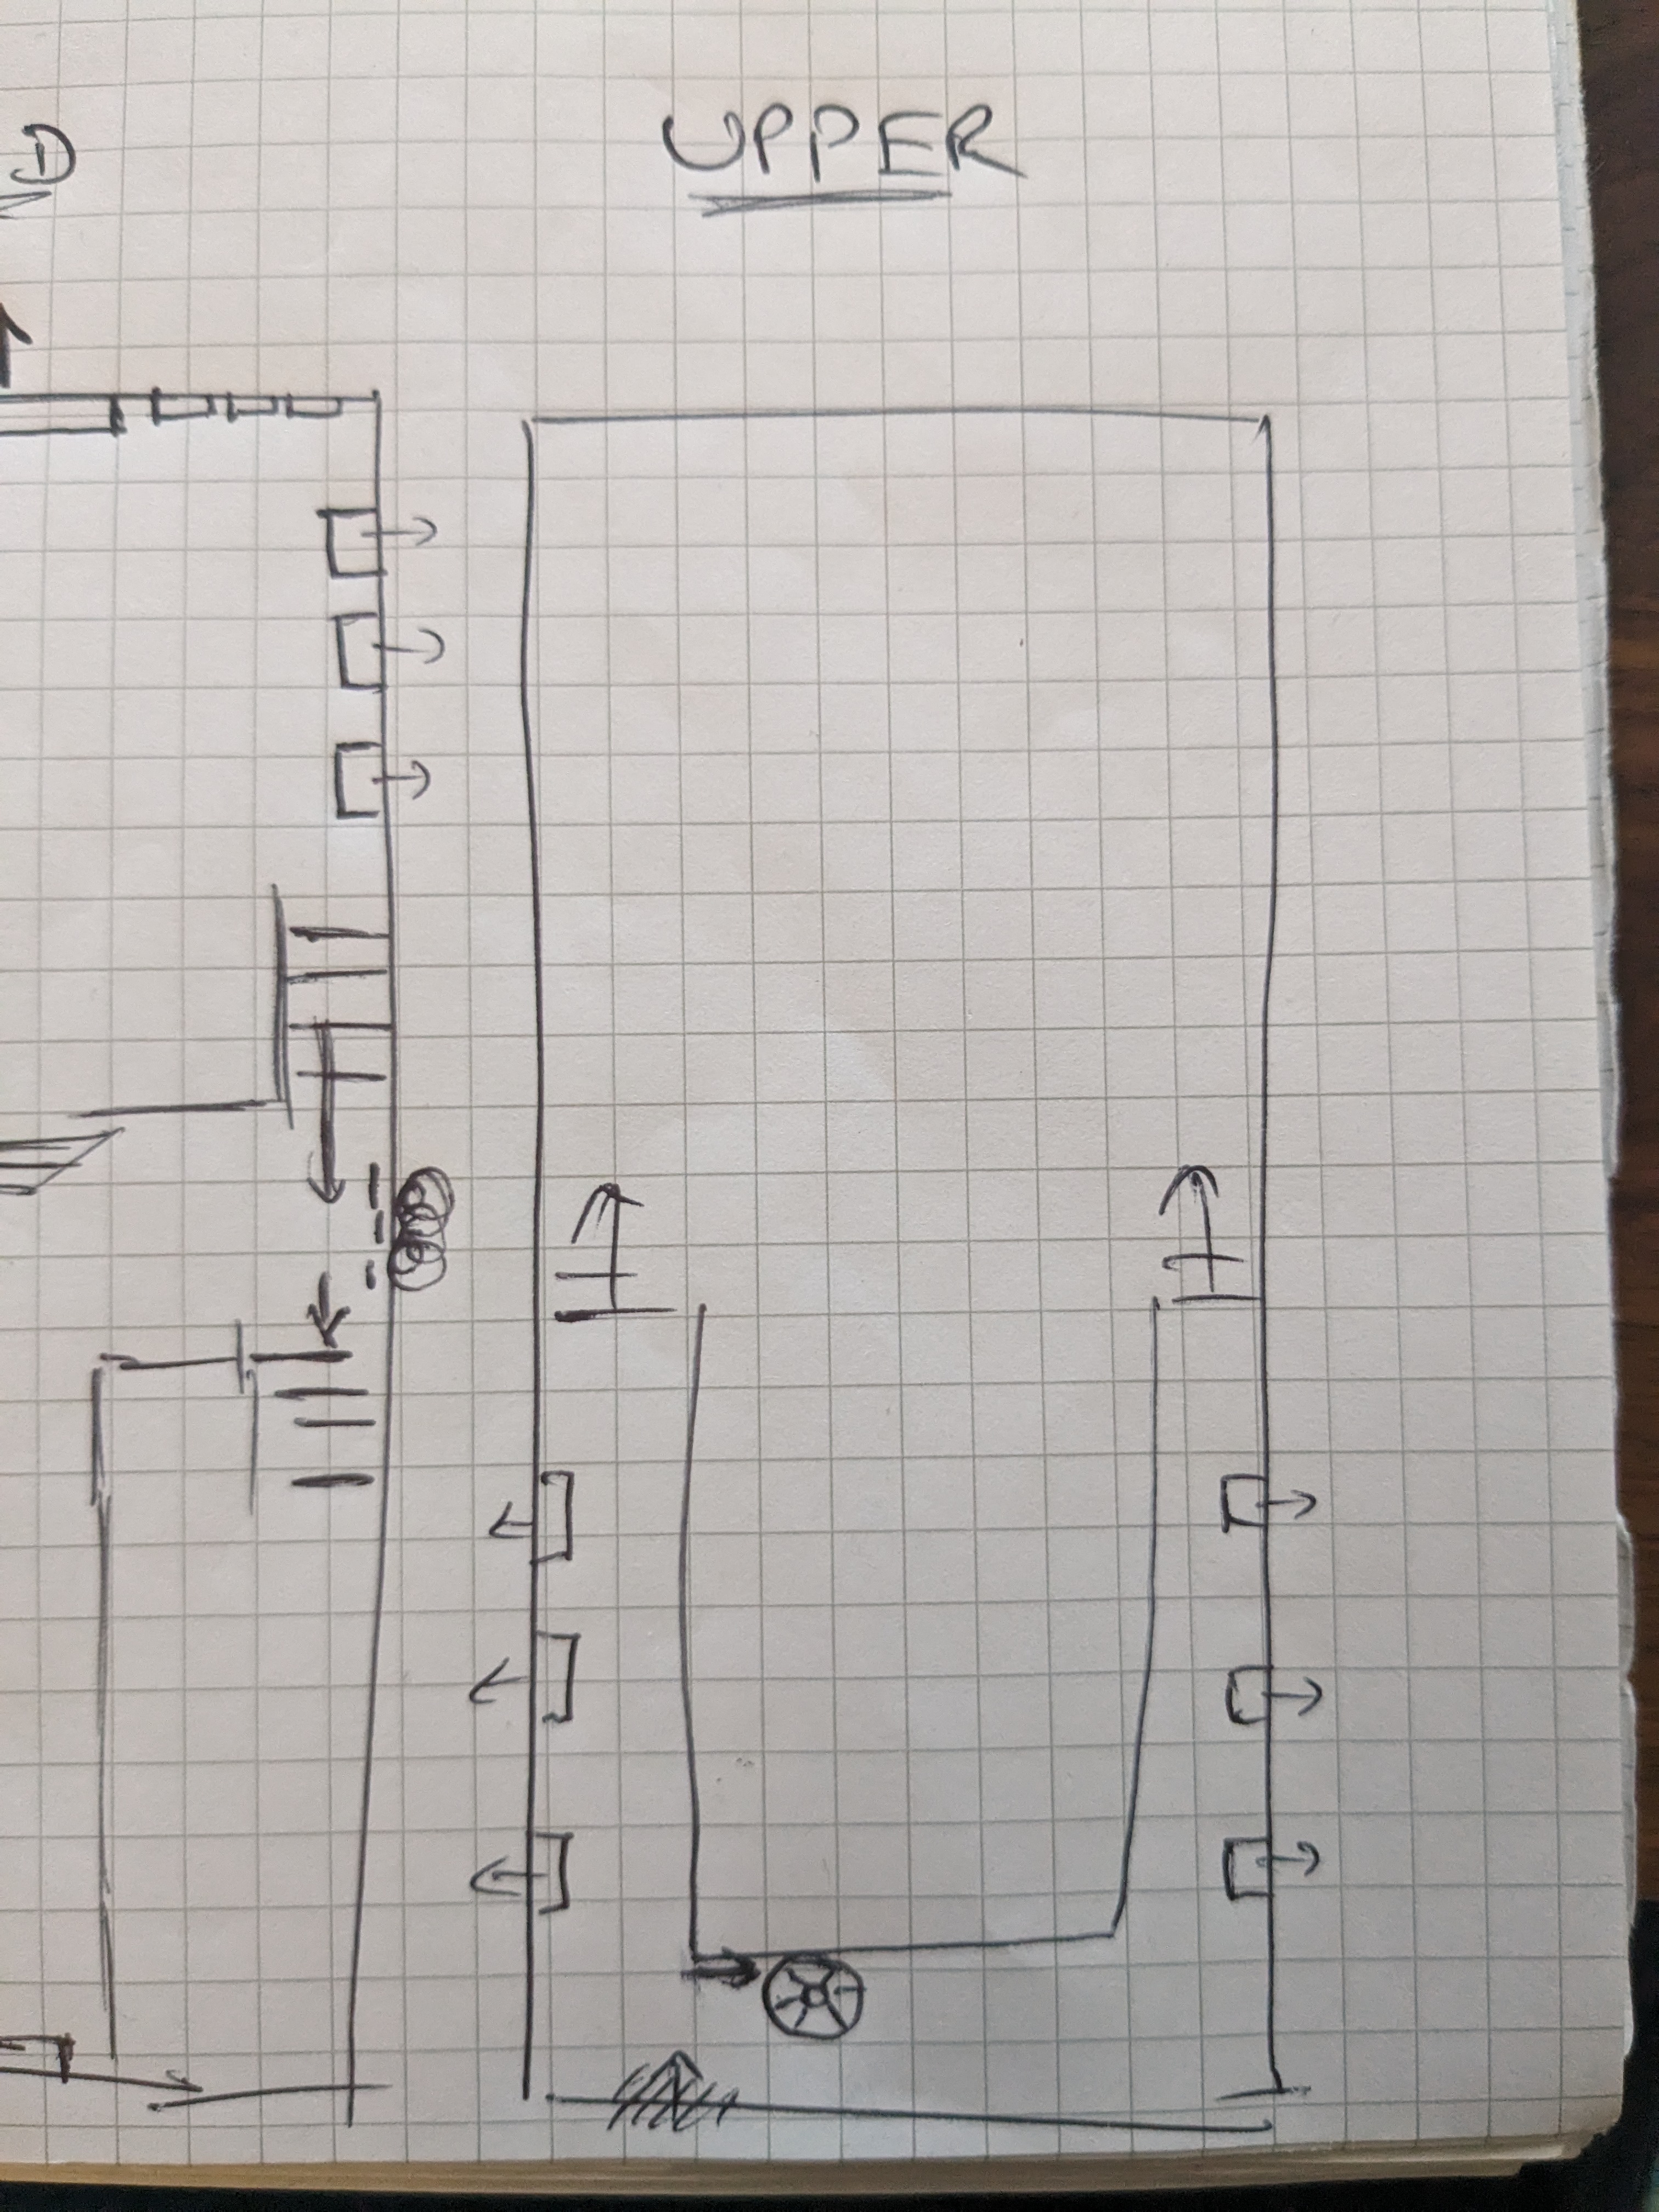 |
Puzzle Room Door Unlocking
The Puzzle Doors behind which Story and Light Puzzle Rooms appear are randomly selected from the pool of 6.
However, In the FIRST Story Loop of the game, the Puzzle Doors which unlock are FIXED by the designer to the the most accessible / noticeable doors.
Player Guidance
The players are guided around the hub by light.
- When Puzzle Rooms are available, their Puzzle Doors give off light.
- When the Elevator to the Dark is available, it emits light upwards.
- When the Light or Dark puzzles are available, torches guiding the player upwards and downwards give off more light.
Story Choices
Story choices are made on the middle level of the Hub.
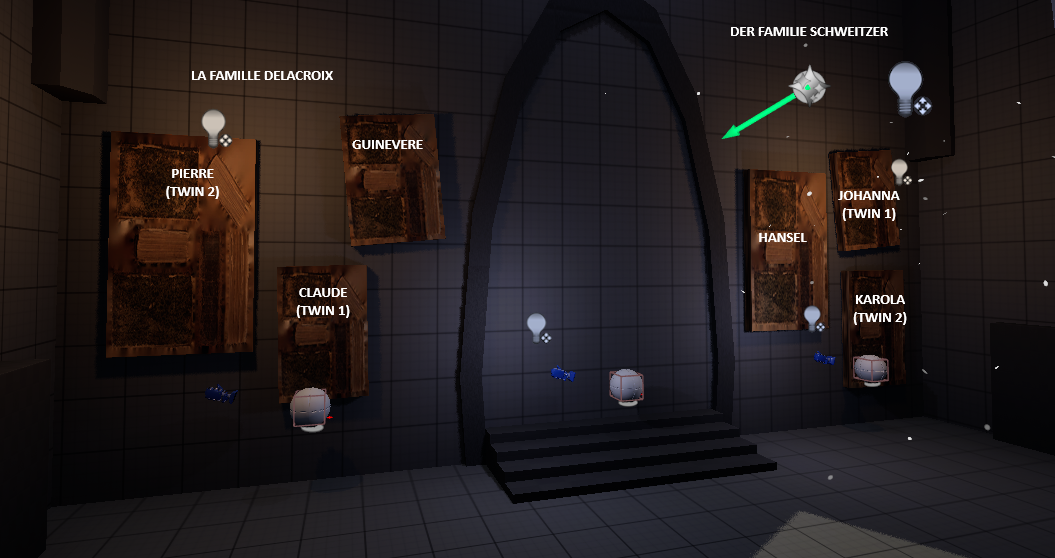
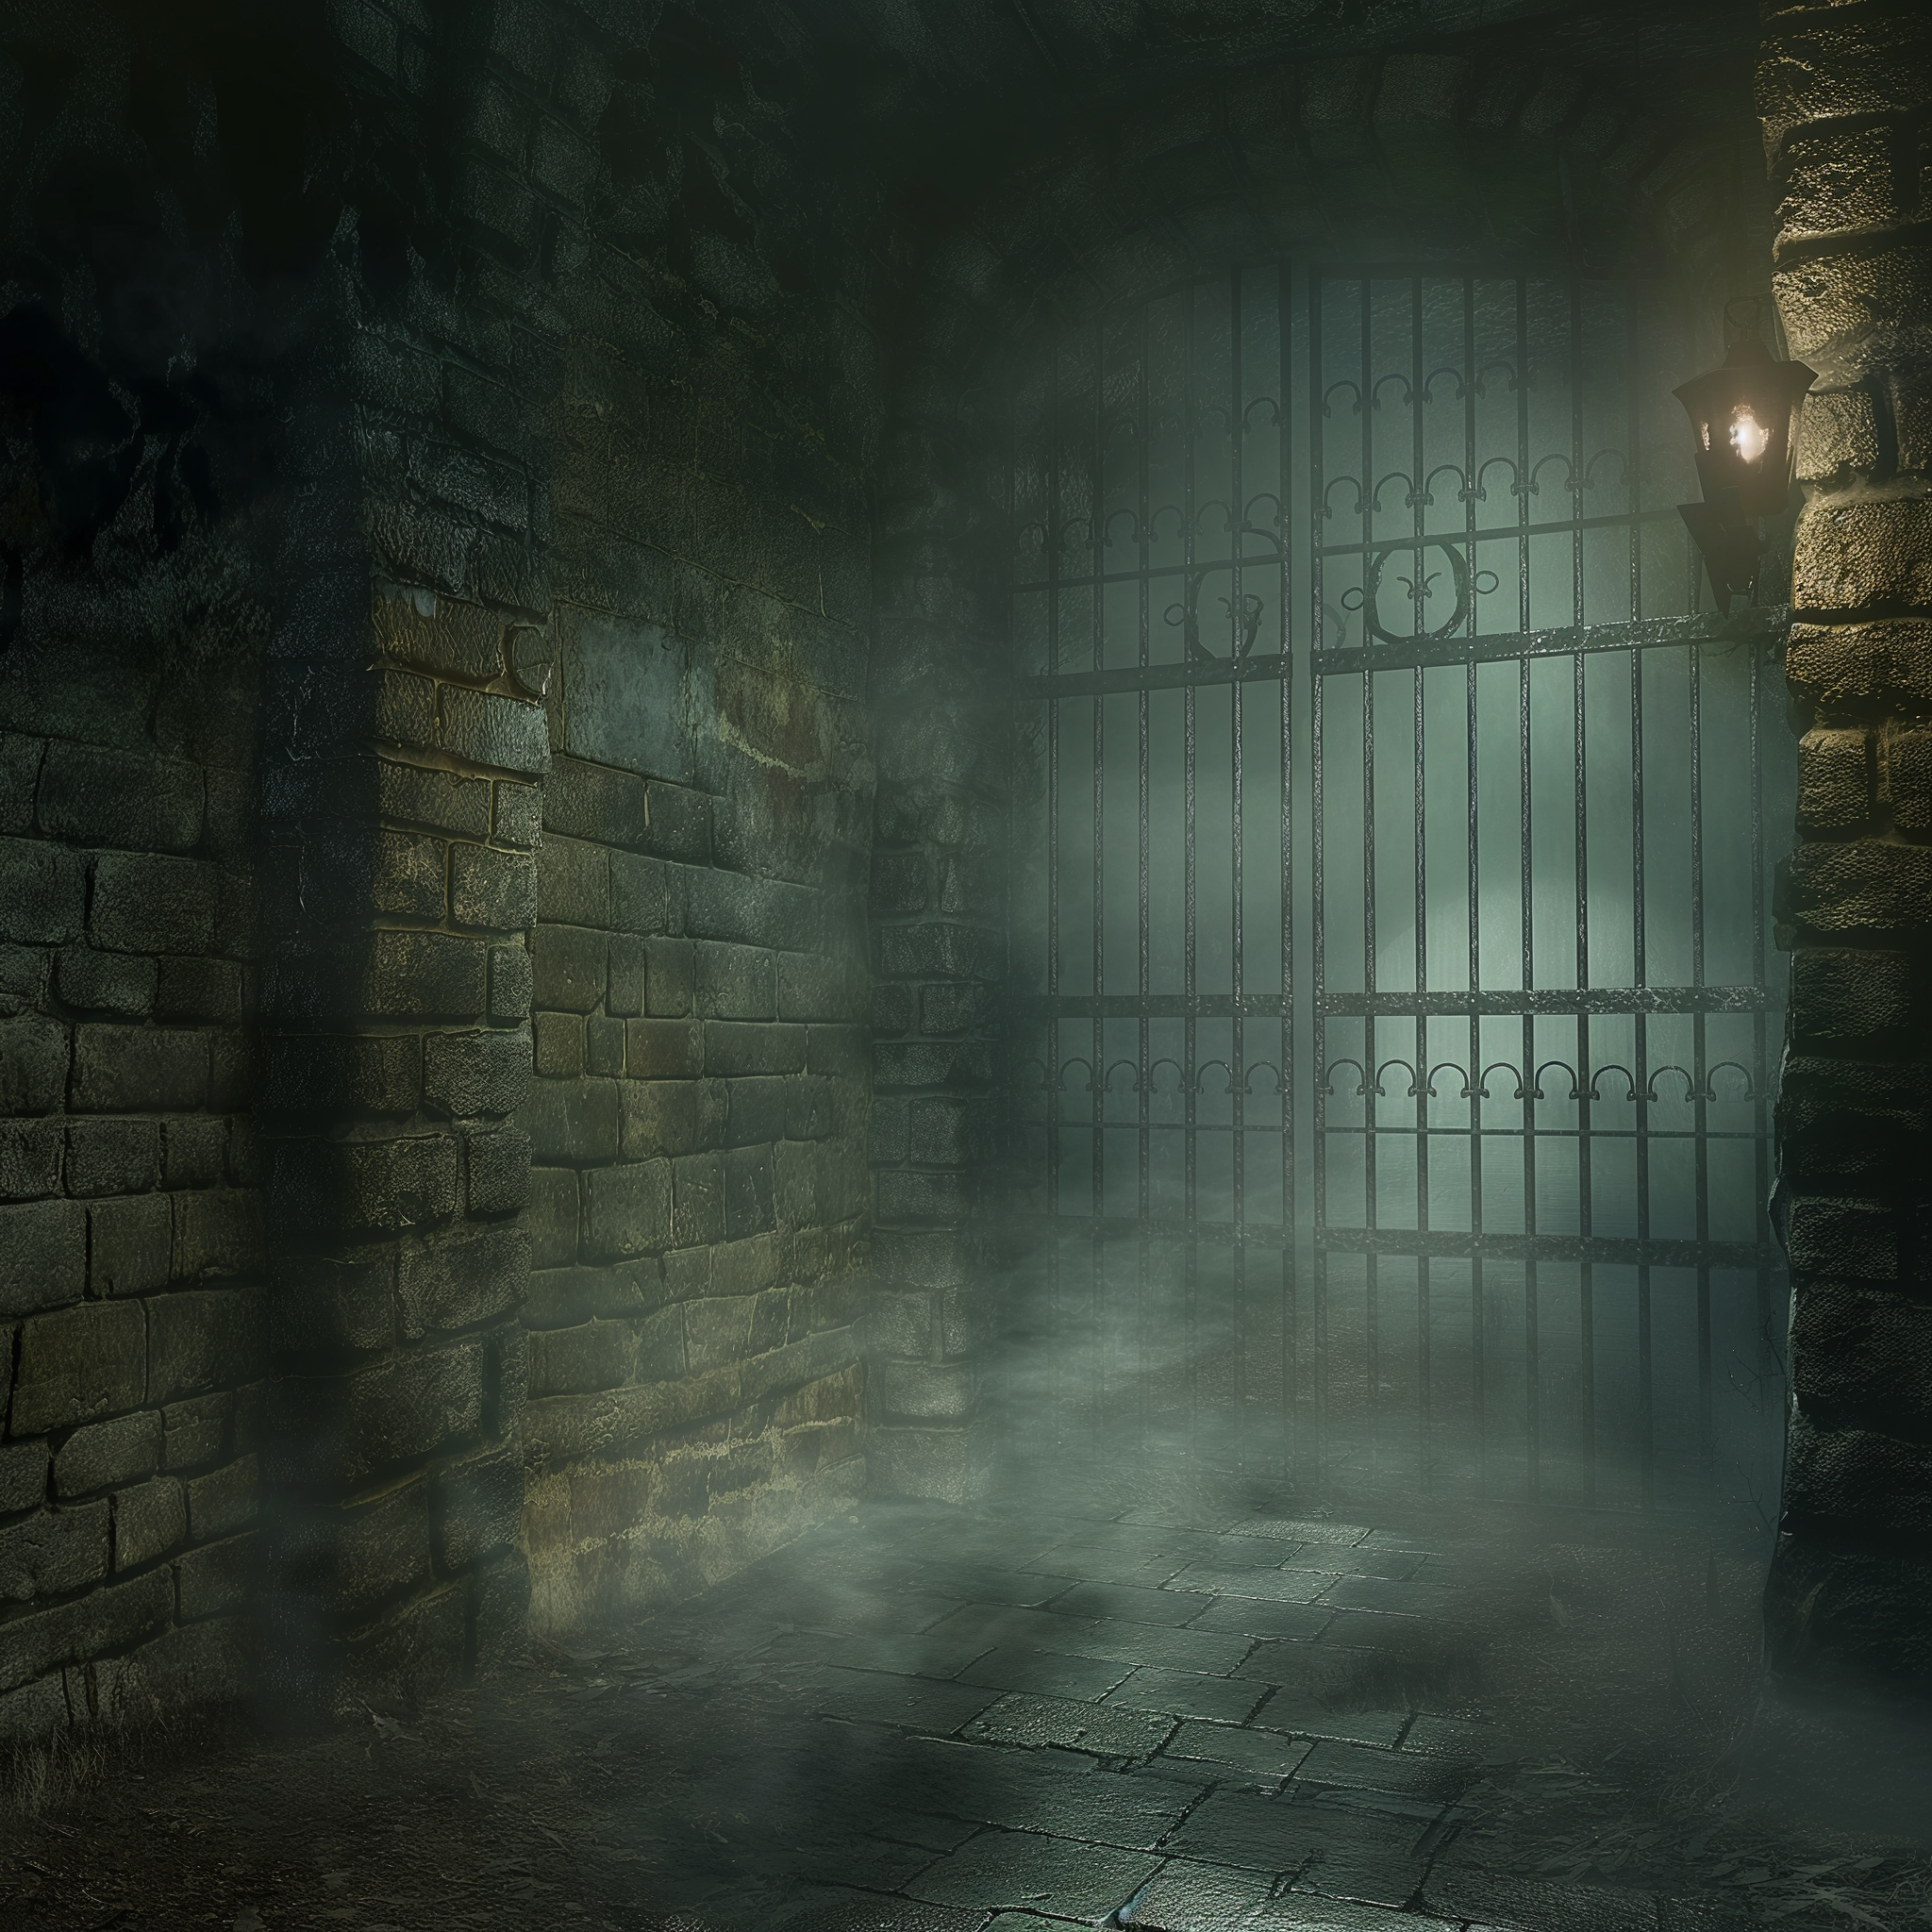
Level Design: Gated Alters
Mysterious fogged rooms blocked by a portcullis or gate, 3 in the Hub. Portraits move behind the alters after choices are made.
- When a Story Choice has been made, the chosen portrait falls off the wall.
- When the player is next locked in a puzzle room, the chosen portraits position moves to behind the gated alter.
- The fog moves back to reveal the portrait.
Level Design: Light Puzzle Rooms
Light Puzzle Summary
Below are designs for the light rooms. These are first draft, and are likely to be changed following user playtests.
Light Room Tone Progression
How the light puzzle rooms could reflect tonal design.
| Room | Room Description | Door |
|---|---|---|
| 1 | - Structurally fits into the layout of the Hub. - Tonally similar to the Hub, player could imagine this room existing as part of the hub structure. |
Traditional |
| 2 | - Structurally does not fit into the layout of the Hub. - Walls are more dilapidated, started to cover in foliage. |
Traditional |
| 3 | - Structurally does not fit into the layout of the Hub. - Room has walls but no roof. - Looking up, the player can see the night sky. - Foliage and plants growing into the room. |
Magical |
Light Room Diagram Key
Light Puzzle Room 1
Solution
- Pull lever to allow light through barrier.
- Rotate Mirror 1 from A to B.
- Rotate Mirror 3 from A to B.
- Stand on pressure pad to open target barrier (player blocks the light to target)
- Crouch
Components
- Focus Staff (x1)
- Mirror Staff (x3)
- Pressure Pad
- Switch
- Light Blocker
Light Puzzle Room 2
- An impossible room, as the corridor goes behind the door.
- Incorporates the Symbol Find wheel introduced to the player in Story Puzzle 1
The symbols being found are Zodiac symbols, which are introduced to the player in Story Puzzle 1.
Symbol 1: Next to the Symbol Find wheel Symbol 2: On a wall, revealed by light beam Symbol 3: On a wall, revealed by light beam
Note: This puzzle was blocked out in-game but not documented.
Light Puzzle Room 3
Continuation of the Star theme.
Symbol 1: Next to the Symbol Find wheel Symbol 2: On a wall, revealed by light beam Symbol 3: Formed by stars, part of the skybox
Note: This puzzle was not designed as it was cut from the vertical slice.
Level Design: Dark Maze
Using a torch, search for hidden levers in a dark maze before the time runs out. If the time runs out, you pass out and awaken at the elevator in the centre of the maze.
Maze Terms
Elevator
- Entrance and exit to the level.
- Raised to mid-height of the maze walls, so bonfires can be clearly seen.
- After all switches are pulled, with light up to show active.
- When active, the player stands on it to escape and complete the puzzle.
Waypoints
- Switch and Bonfire.
- On slightly raised platform (not as high as the elevator).
- Majority hidden by the maze wall, but ashes and light from top of bonfire can be seen when within the maze.
- Can include environmental storytelling.
- Surrounded by a circular area of open space, allowing the player to recover from the claustrophobia of the maze.
Areas & Boundaries
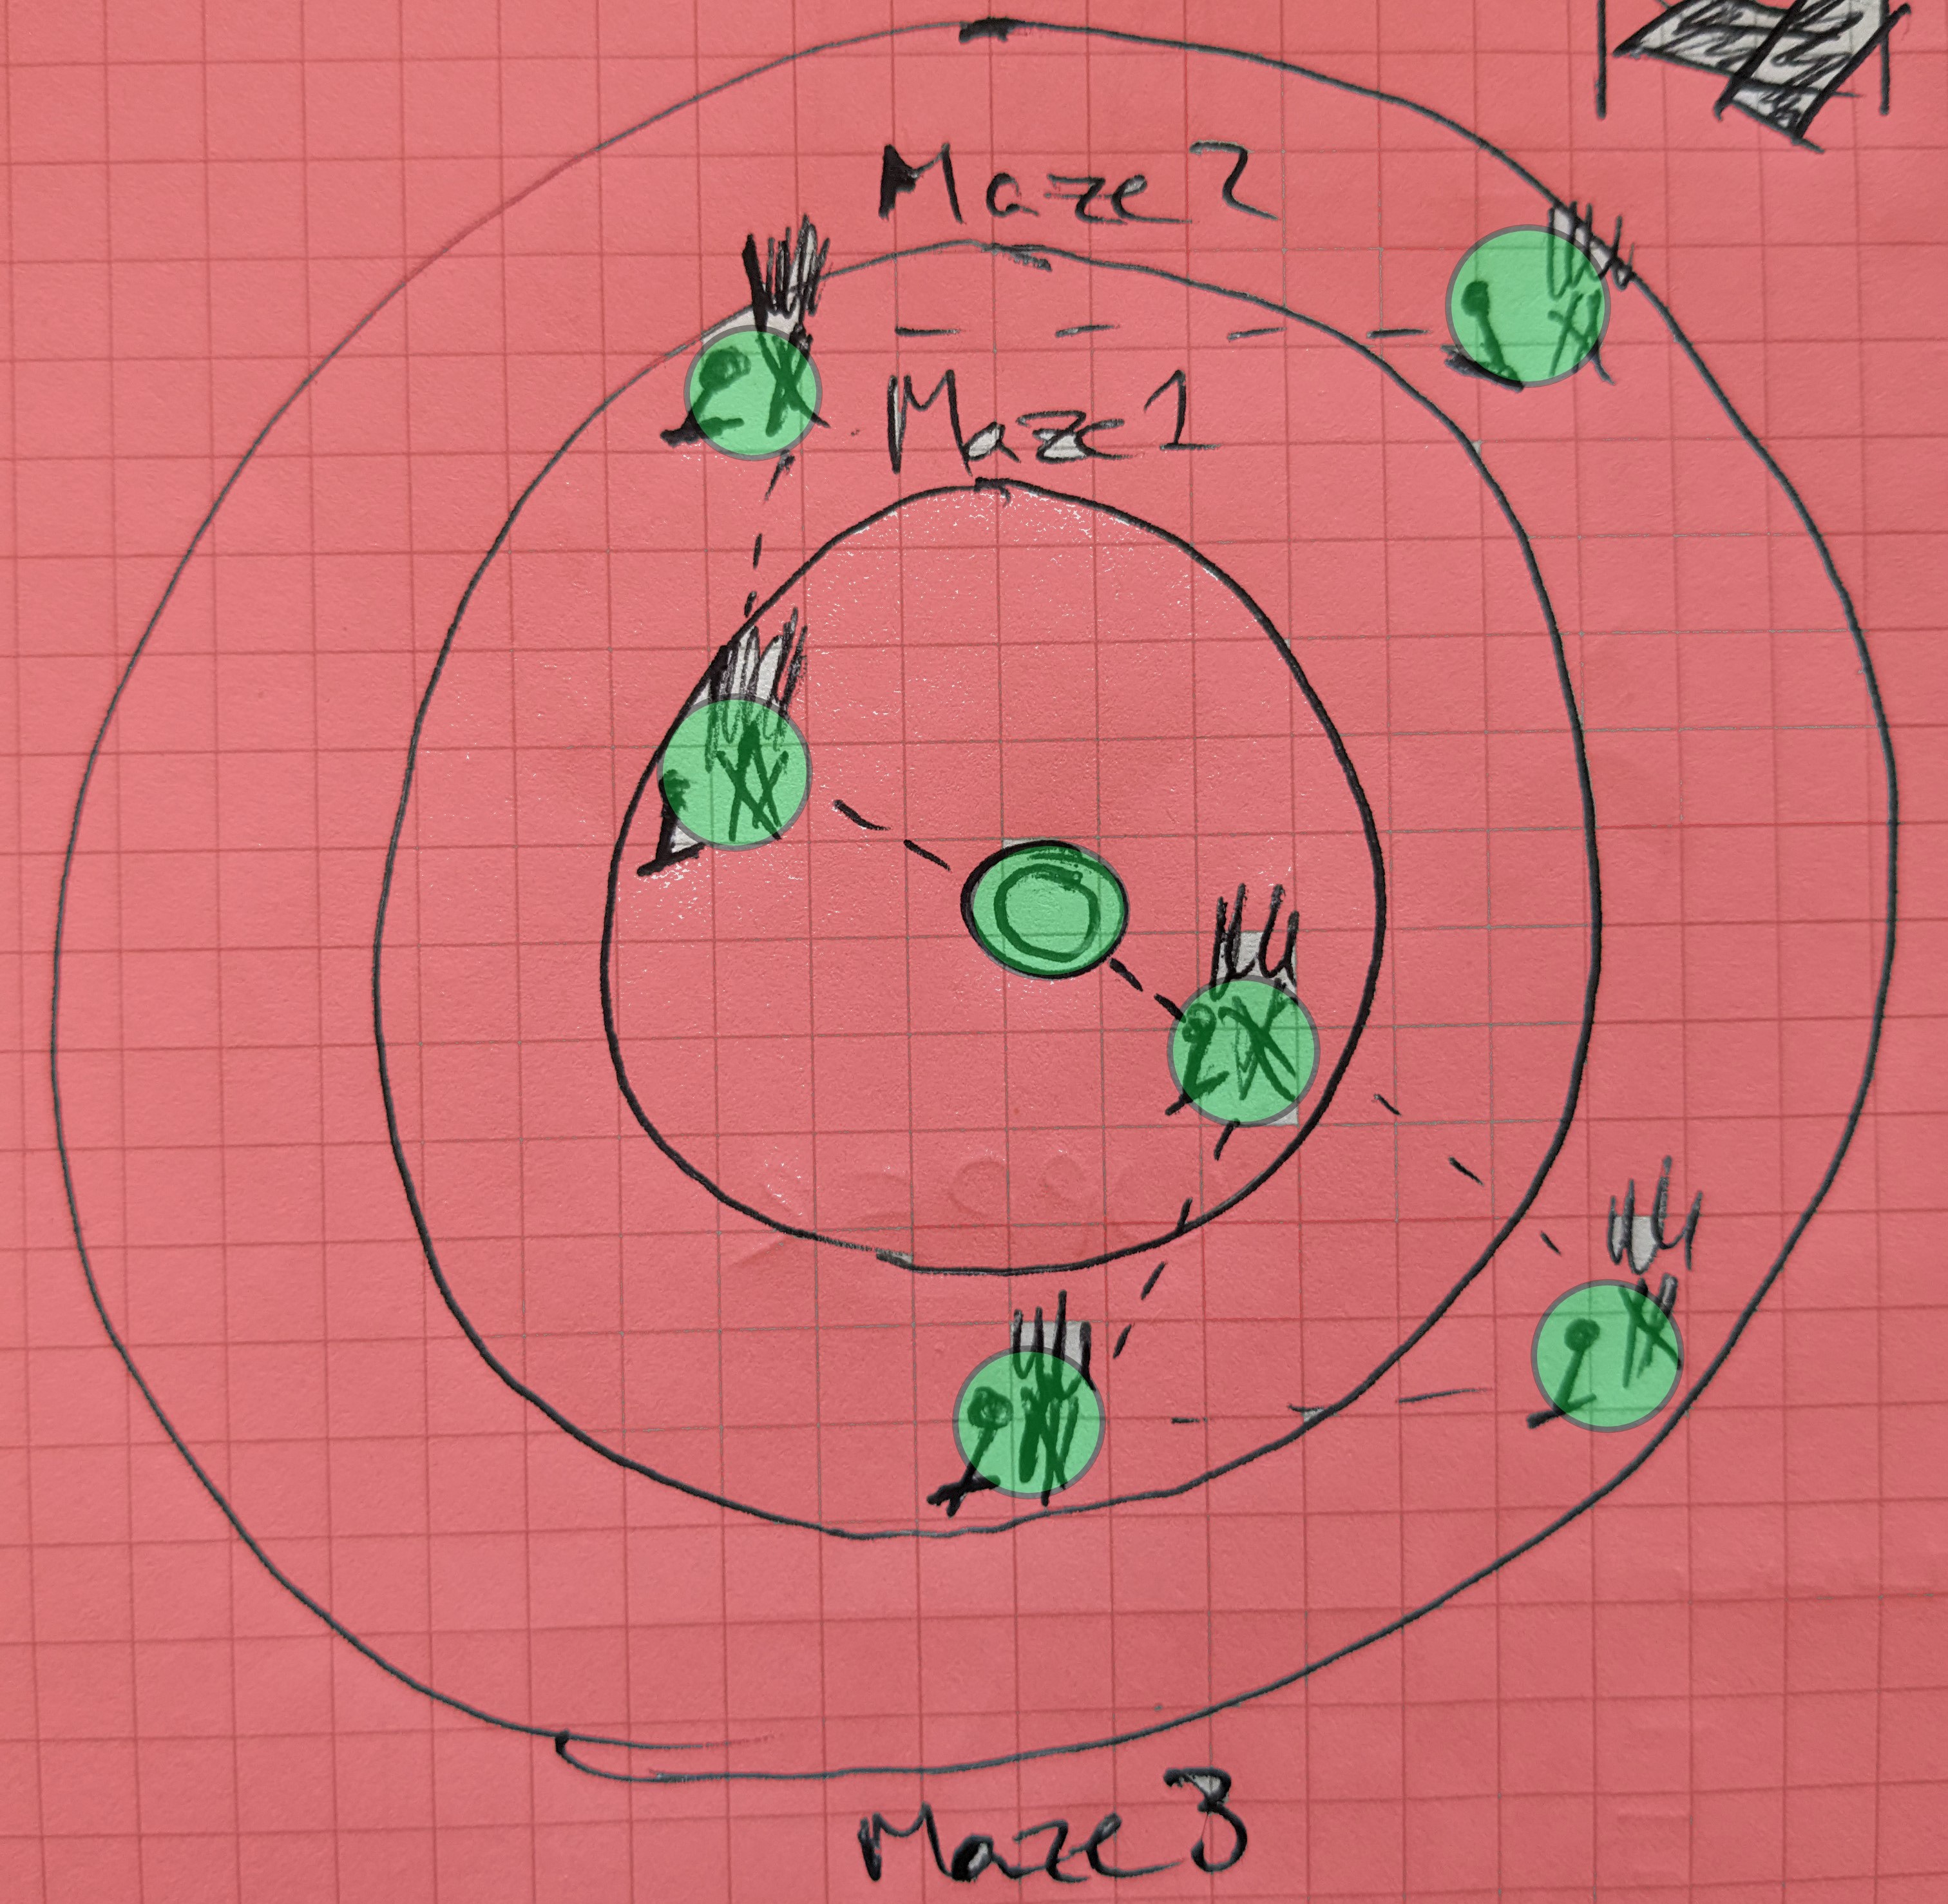
On the first trip to The Dark, only the MAZE 1 is available to explore, with two switches in it. MAZE 1 is surrounded by BOUNDARY 1.
On future trips to The Dark, MAZE 2 and MAZE 3 open up.
Areas
- Explorable areas in the maze increase each time you return to the maze.
- Areas include Waypoints, which are not spawned unless the areas is open.
Boundaries
- Outside the boundary is dark fog.
- Stepping into the fog will quickly consume the player and make them PASS OUT.
- The boundary area increases each time you return to the maze.
| AREAS | BOUNDARIES |
|---|---|
 |
 |
| MAZE 1 = Green MAZE 2 = Amber MAZE 3 = Red |
BOUNDARY 1 = Green BOUNDARY 2 = Amber BOUNDARY 3 = Red |
Safe Zones
- Waypoints and the Elevator are SAFE ZONES.
- Standing in these zones will PAUSE all timers running in the maze.
Maze Challenge
The player is challenged to find all the Waypoints in the maze, then run back to the Elevator to complete the level.
The player works against the clock, with timers running when they are outside the safe zones.
The timers increase the Intensity in the maze. At maximum intensity, the player Passes Out.
Passing Out
Passing out is the fail state of the maze challenge.
- Players vision blurs to black.
- Player get transported back to the Elevator.
- All timers reset.
- All switches reset.
Intensity Timers
TOTAL_MAZE_TIME(seconds)- Starts as soon as the player steps out of the elevator.
- Pauses when in a Safe Zone.
- Resets when the player passes out.
TIME_SINCE_SAFE_ZONE(seconds)- Starts when a player steps out of a Safe Zone.
- Resets when a player enters a safe zone.
- Resets when the player passes out.
Intensity Thresholds
Pseudocode for working out the current player intensity. Happens every tick.
CURRENT_TIMER = TIME_SINCE_SAFE_ZONE + (TOTAL MAZE TIME * WEIGHT)

WEIGHT = 0.1
PASS_OUT_SECONDS = 120

PLAYER_STATE = Normalise CURRENT_TIMER using PASS_OUT_SECONDS to get a 0 to 1 value.
With a PLAYER_STATE value of between 0 and 1, we can tune the intensity of the maze effects.
| PLAYER_STATE threshold | Intensity | Horror Effects |
|---|---|---|
| 0 | None | None |
| 0.4 | Low | {WIP} |
| 0.7 | Medium | {WIP} |
| 0.85 | High | {WIP} |
| 1 | Pass Out | Fade to black |
Maze Completion
- Maze complete when all switches pulled.
- On maze complete, the elevator sends a beam of light upwards.
- Beam of light is visible from anywhere in the maze.
Maze Horror Effects {WIP}
Maze Map
The maze has a set structure, which can dynamically change.
| Diagram - Two ‘Ring Walls’ |
|---|
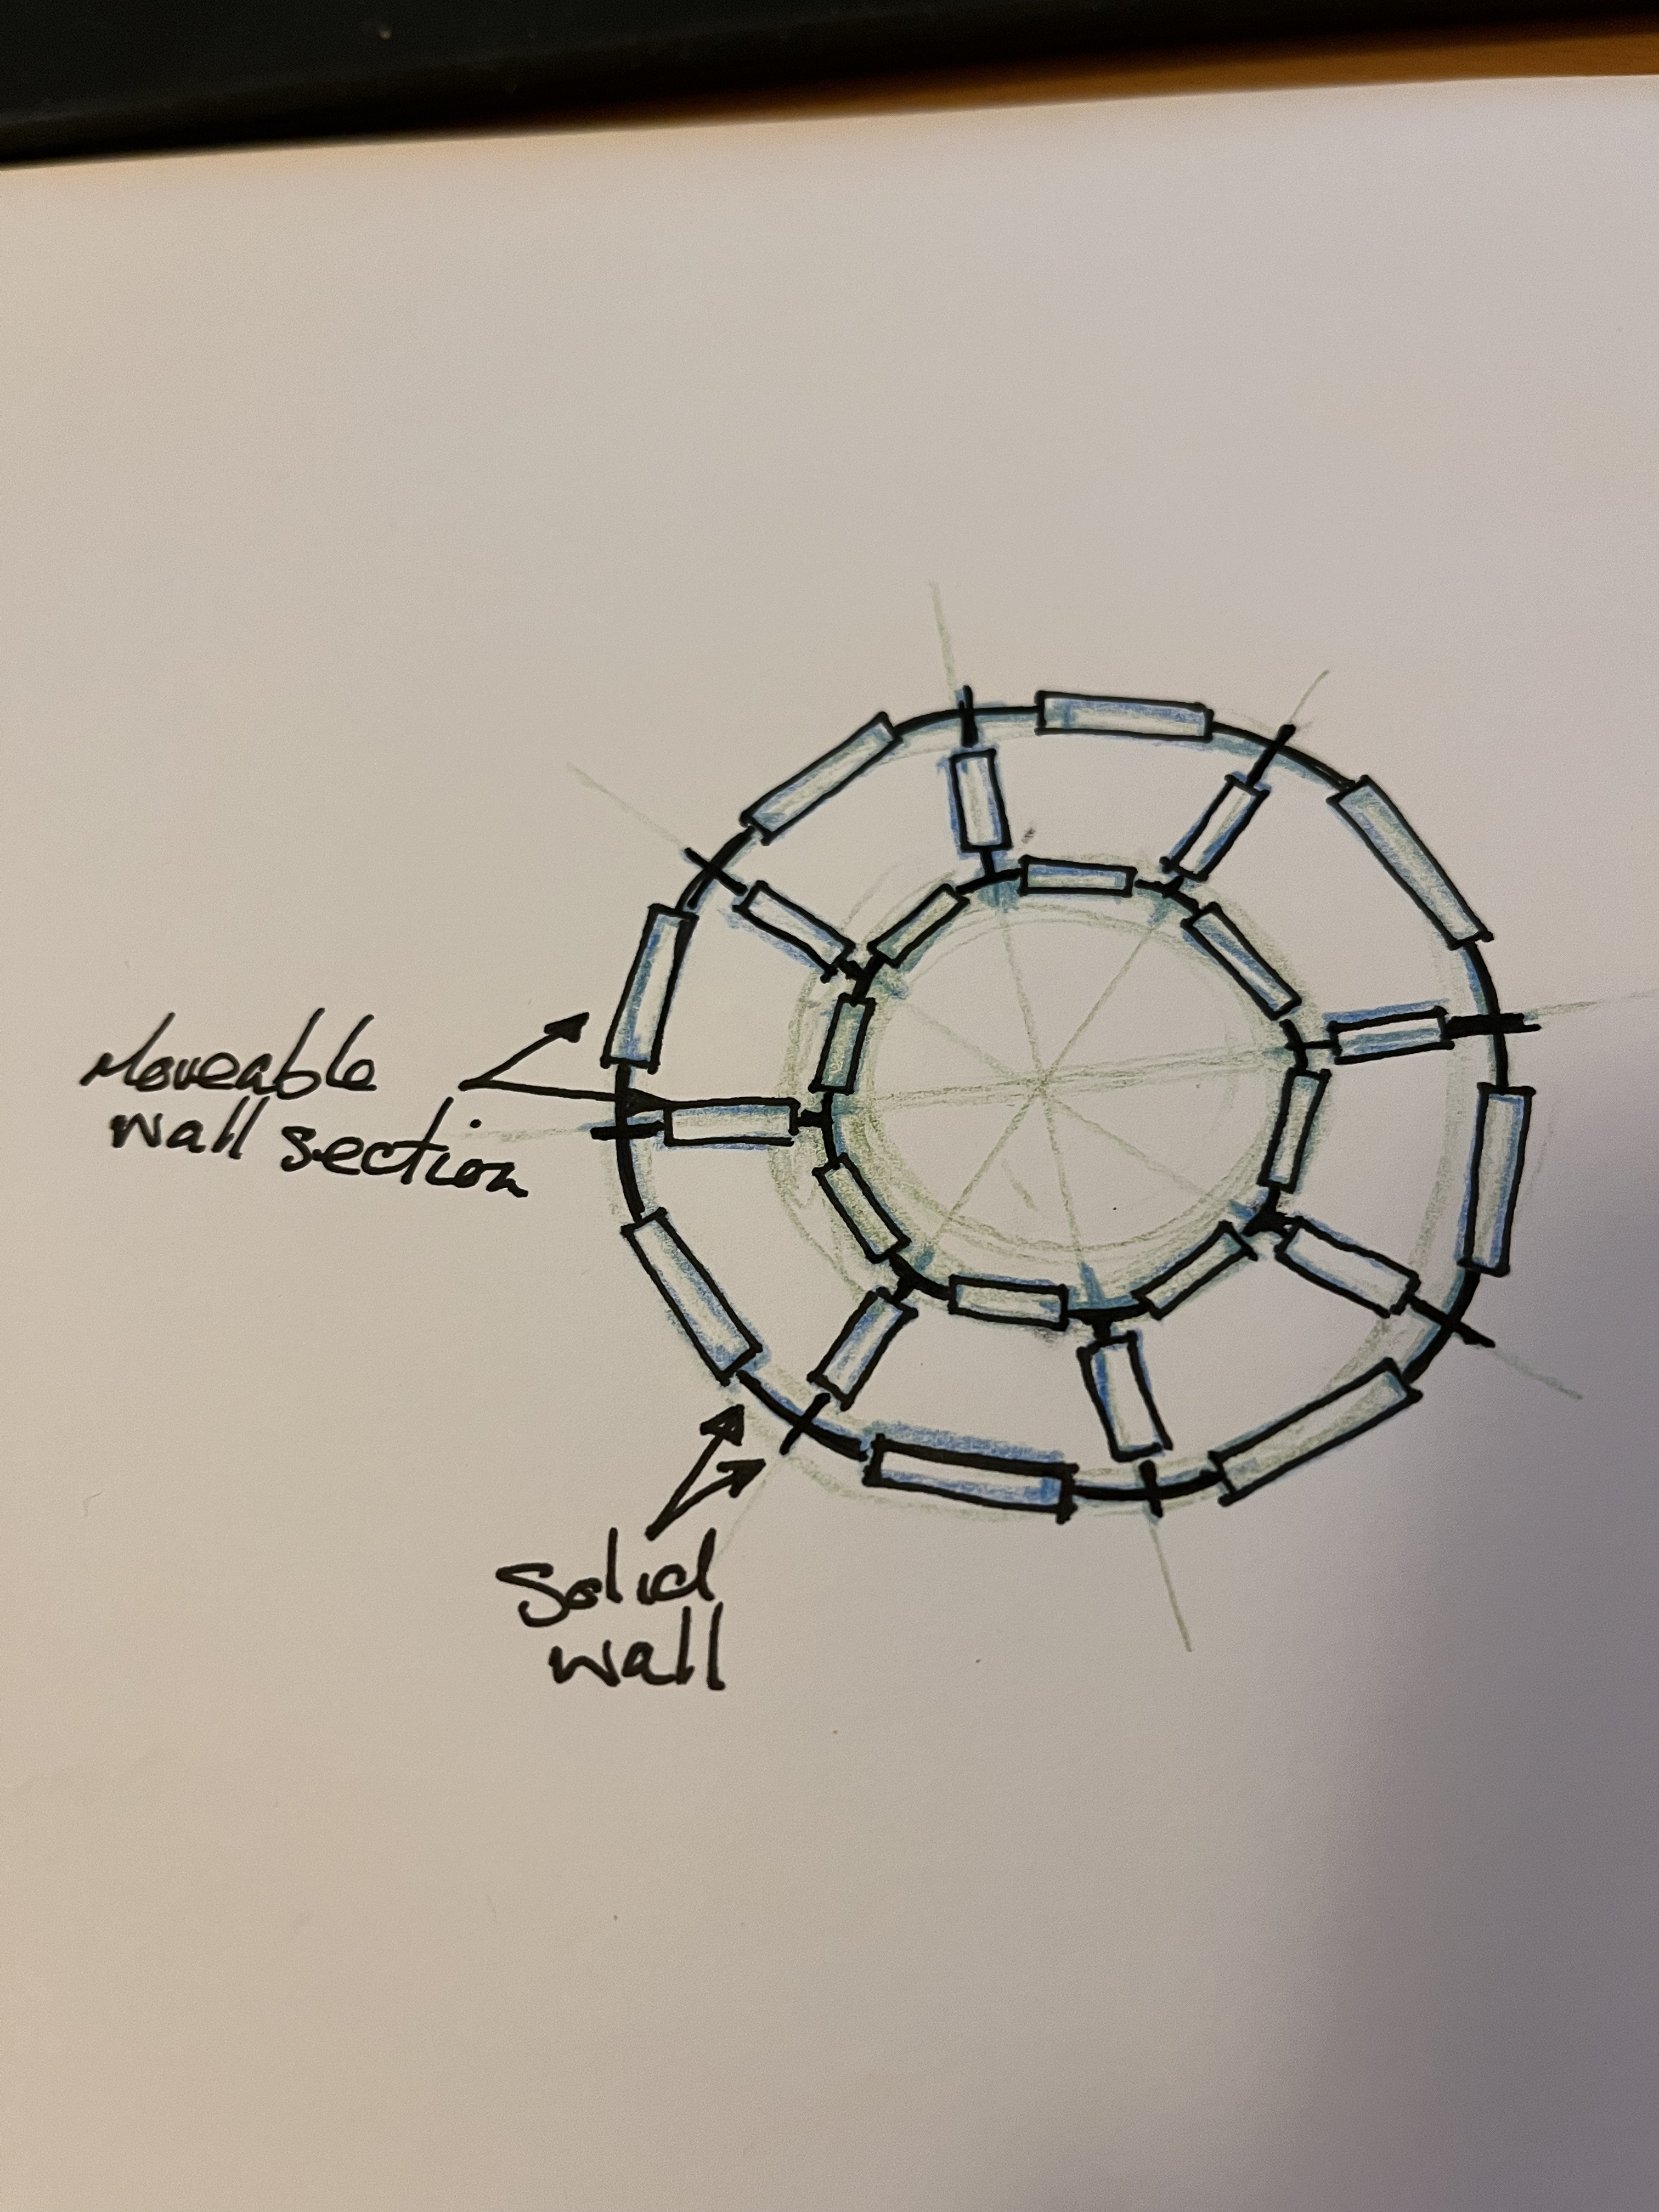 |
| Ring Wall Construction, - Solid Walls - Moveable Wall Sections |
Technical Design
-
Ring Walls are composed of solid wall and moveable walls sections that can be either {up or down} depending on the maze design.
-
Ring Walls always contain the same amount of moveable wall sections. Therefore, there are always 8 ‘Segments’ in a ring.
-
As the ring walls become larger, the moveable wall sections are spaced out so that there is always the same number of moveable sections and Segments in the ring wall.
-
Ring walls themselves have two states {up / down} and override the state of all moveable wall sections attached to them. The outer ring wall is always the parent of all moveable wall sections mounted in-between ring walls.
Art & Portal Links Moveable wall sections can either be wooden panels, or portals. Portals are always paired, but portals can be linked to portals in other area’s to further confuse the player.
Level Design: Story Puzzle Rooms
Story Puzzle Room Summary
In Story Puzzle Rooms, players find symbols and enter them into a Rotating Symbol Puzzle. Each room links to the story being told.
Story Puzzle Room Tone Progression
| Room | Room Description | Door |
|---|---|---|
| 1 | - Structurally fits into the layout of the Hub. - Tonally similar to the Hub, player could imagine this room existing as part of the hub structure. |
Traditional |
| 2 | - Structurally does not fit into the layout of the Hub. - Has a window, which shows an outside space with a different environment. |
Traditional |
| 3 | - Structurally does not fit into the layout of the Hub. - Different environment completely. |
Magical |
Rotating Symbol Puzzle
Story Puzzle Rooms contain a ‘Rotating Symbol Puzzle’, players are required to find 3 symbols hidden in the room, then rotate the puzzle to the correct symbols.
These are simple puzzles which encouraging the player to explore the story environment, and allow the player take a break before tacking the more complex Light and Dark puzzles.
Example
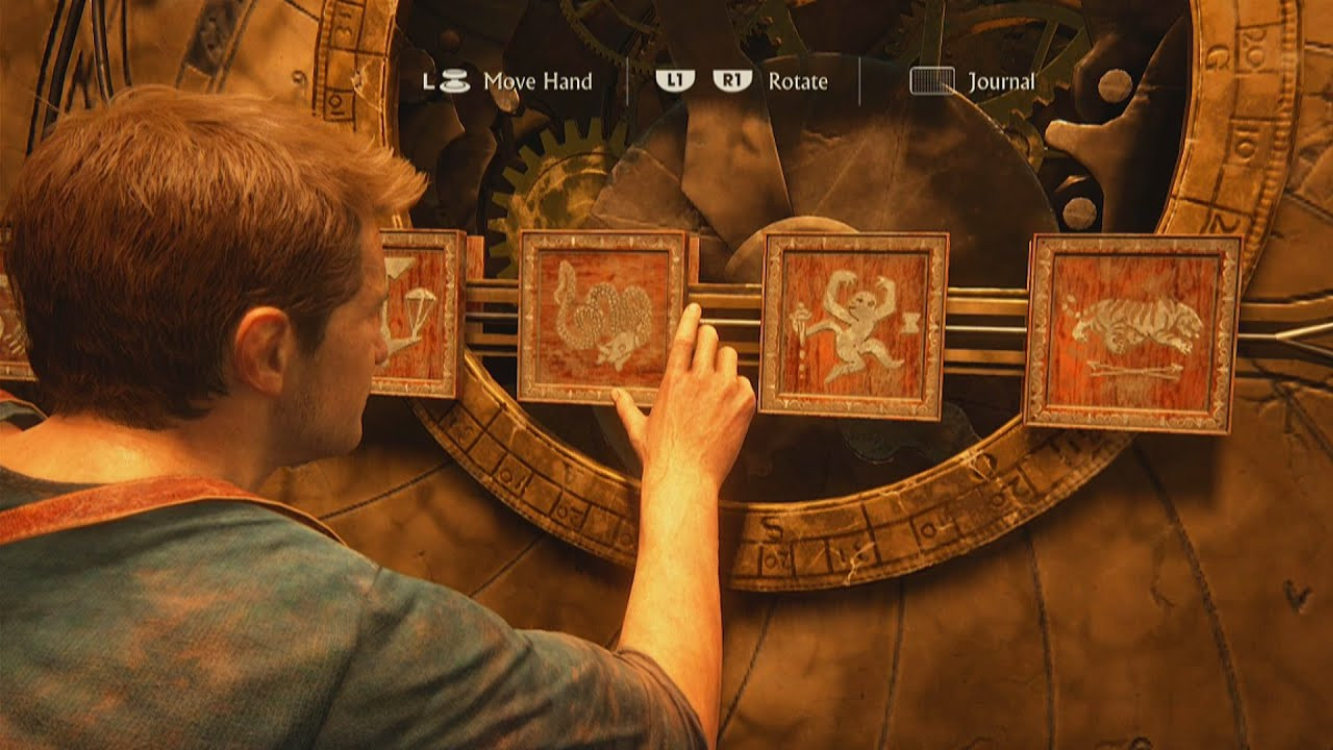
Structure of the Symbol Puzzle asset
- 3 rotating cubes with a rod running through
- 4 unique symbols on each rotating cube (no duplicate symbols in the puzzle!).
- 12 unique symbols per puzzles.
Interaction with the Symbol Puzzle asset
- Player gets close to cubes to interact.
- On interact, cube rotates 90 degrees, rotating towards the player.
- Player can see the next cube coming.
Completion
- When completed, the door will unlock and the symbols can no longer be rotated.
Story Puzzle Room 1
Story Room for The Lovers - Study.
Required Symbols: Zodiac symbols (these symbols are used in Light Puzzle 2 and 3)
Note: This room was blocked out in-editor and given to the artists
Story Puzzle Room 2
Story Room for The Twins - Outdoor Banquet.
Story Puzzle Room 3
Story Room for The War - Graveyard.
Level Design: End
The ending is a long corridor, the player walks forward listening to the Game Ending narrative, and heading the outro music.
Level Flow (Step by Step)
- The player steps through a door to The End.
- The player begins walking down the corridor, the final game narrative plays.
- The narrative finishes, the ending music plays.
- The player reaches a bright light. As they get closer to the light, their vision blurs and then fades.
- End credits.
Competitive Set
- Gone Home
- What Remains of Edith Finch
- The Witness
- Botany Manor
- The Talos Principle
- Return of the Obra Dinn
Term List
Puzzle Type
A style of puzzle in the game; Light, Dark, Story. Each puzzle type tests the player in a different way.
Puzzle types have 3 levels of difficulty, each with each level of difficult introducing a modified game mechanic, or increasing the complexity of the puzzle.
Puzzle Set
A group of 3 Puzzle Levels of aligned difficulty; one Light Puzzle Type, one Dark Puzzle Type, one Story Puzzle Type.
The difficulty of the puzzle set is based on the players progress in the Story Loop. Later stories, harder puzzle sets.
The player can choose the order in which they tackle Puzzle Room within a puzzle set.
Puzzle Room
The areas that are spawned and de-spawned behind doors in the Hub which hold a single challenge for the player to complete.
Once completed, the player progresses in the Hub with a Story Detail. When level are completed they are either; never played again, or never played again in their current configuration.
Puzzle Door
A door in the game behind which a Puzzle Room can be ‘spawned’. Puzzle Doors can only spawn one Puzzle Type.
Story
The overarching story of the game. The story of two, feuding houses.
Story Loop
The story being told during the current Puzzle Set. Three story loops; The Lovers, The Twins, The War.
Story Detail
A snippet of the detail about the Story Loop the player gets upon return to the Hub after completing a Puzzle Level. Details can be given in the form of voiced dialogue the player hears.
Story Choice
Upon completing the Puzzle Set and returning to the Hub, the player is given a key item which is used to make a choice of the outcome of the Story Loop. When the choice is made, the player is moved on to the next Story Loop (until all 3 loops are complete).
Character Portraits
The Character Portraits are prominent in the Hub. The player will walk up the visual and be given a overview of the story, with the protagonist characters of the story highlighted.
On completion of a Puzzle Set, the player will go to the Character {Visual} to select a Story Choice.
Hub
Core level of the game the player will continually return to after completing a Puzzle Room.
Upon returning to the hub after completing a Puzzle Room the player is rewarded with Story Detail. If the player returns to the hub after completing a Puzzle Set, they are rewarded with a Key Item which allows them to make a Story Choice. When the choice is made, they move to the next Story Loop.
On completion of all 3 Story Loops, the player is rewarded with a Game Ending.
Game Ending
The final corridor long in the game, a sweeping piece of music and spoken narrative wraps up the Story and gives different endings based on the Story Choices the player has made.
World Tone Review
Using a combination of portals and doors, we can create a tonal shift in the game; taking the player from a world grounded in reality, to a world that breaks from reality as the story progresses.
In Addition: Tonal Shifts In Games
‘Portal’ and ‘What Reminds of Edith Finch’ are great examples of slow tone shifts in games.
Portal
Portal starts in a clinical lab environment, slowly hints at an ‘outside world’ beyond the lab, before the major reveal of the game. Portal Reveal
Note: If you haven’t played Portal, this video spoils a brilliant twist!
What Remains of Edith Finch
Finch starts in a world grounded in reality, with the player exploring a quirky house. It sets up the magical and fantastical elements of the game through dialogue, visuals, then eventually jumps into another characters memories.
1. Dialogue Setup
Edith Finch Example: Hinting at a tone shift
‘Nothing in the house looked abnormal, there was just too much of it’
‘Like a smile with too many teeth’
2. Visual Setup
One of many visual setups, increasingly surreal.
3. Reality Break
Finally, there’s a clear break from reality.
Open a diary and dive into the memory of a child character, eventually becoming a bird.